xDrip+ settings
If not already set up, then download xDrip+.
Disable battery optimization and allow background activity for the xDrip+ app.
You can safely download the latest APK (stable) unless you need recent features or are using sensors that are being actively integrated (like G7), in which case you should use the latest Nightly Snapshot.
Basic settings for all CGM & FGM systems
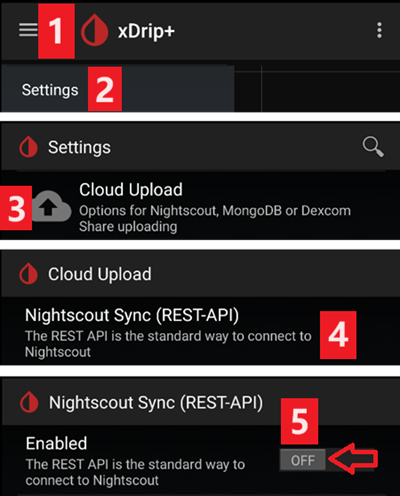
Disable Nightscout upload
Starting with AAPS 3.2, you shouldn’t let any other app upload data (blood glucose and treatments) to Nightscout.
→ Hamburger Menu (1) → Settings (2) → Cloud Upload (3) -> Nightscout Sync (REST-API)(4) → Switch OFF Enabled (5)
Disable automatic calibration and treatments
If you use an older version of AAPS (before 3.2), make sure to deactivate Automatic Calibration (7)
If the checkbox for Automatic Calibration is checked, activate Download treatments (6) once, then remove the checkbox for Automatic Calibration and deactivate Download treatments again.
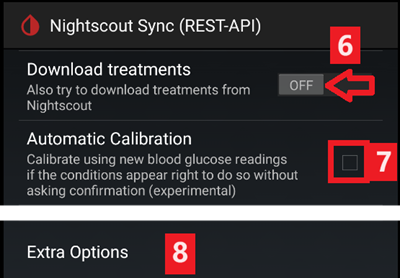
Tap Extra Options(8)
Safety warning
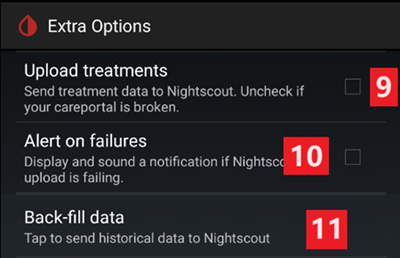
You must deactivate «Upload treatments» from xDrip+, otherwise treatments can be doubled in AAPS leading to false COB and IOB.
Deactivate Upload treatments(9) and make sure you will NOT use Back-fill data (11).
Option Alert on failures should also be deactivated (10). Otherwise you will get an alarm every 5 minutes in case Wi-Fi/mobile network issues or if the server is not available.
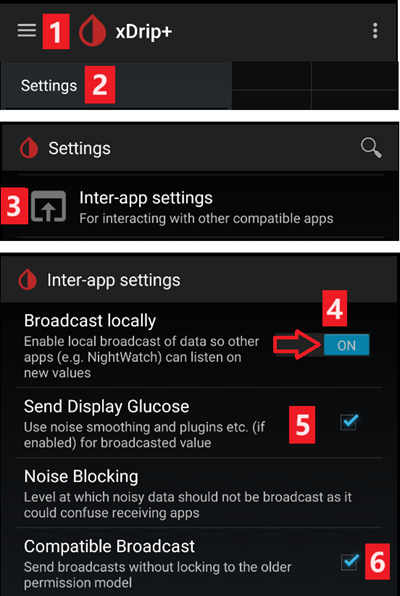
Inter-app Settings (Broadcast)
If you are going to use AAPS and the data should be forwarded to i.e. AAPS you have to activate broadcasting in xDrip+ in Inter-App settings.
→ Hamburger Menu (1) → Settings (2) → Inter-app settings (3) → Broadcast locally ON (4)
In order for the values to be identical in AAPS with respect to xDrip+, you should activate Send the displayed glucose value (5).
Enable Compatible Broadcast (6).
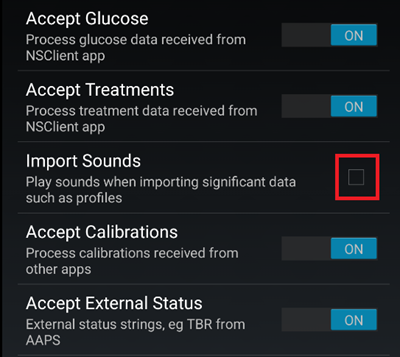
If you have also activated Accept treatments in xDrip+ and Enable broadcasts to xDrip+ in AAPS xDrip+ plugin, then xDrip+ will receive insulin, carbs and basal rate information from AAPS.
If you enable Accept Calibrations, xDrip+ will use the calibrations from AAPS. Be careful when you use this feature with Dexcom sensors: read this first.
Remember to disable Import Sounds to avoid xDrip+ making a ringtone every time AAPS sends a basal/profile change.
Identify receiver
If you discover problems with local broadcast (AAPS not receiving BG values from xDrip+) go to → Hamburger Menu (1) Settings (2) → Inter-app settings (3) → Identify receiver (7) and enter
info.nightscout.androidapsfor AAPS build (if you are using PumpControl build, please enterinfo.nightscout.aapspumpcontrolinstead!!).Pay attention: Auto-correction sometimes tend to change i to capital letter. You must use only lowercase letters when typing
info.nightscout.androidaps(orinfo.nightscout.aapspumpcontrolfor PumpControl). Capital I would prevent the App from receiving BG values from xDrip+.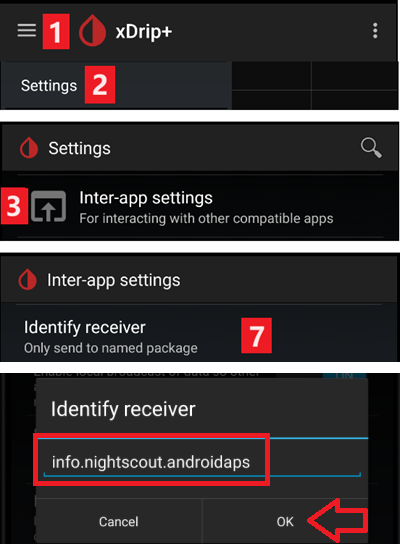
Use AAPS to calibrate in xDrip+
If you want to be able to use AAPS to calibrate then in xDrip+ go to Settings → Interapp Compatibility → Accept Calibrations and select ON.
You may also want to review the options in Settings → Less Common Settings → Advanced Calibration Settings.
Dexcom G6
The Dexcom G6 transmitter can simultaneously be connected to the Dexcom receiver (or alternatively the t:slim pump) and one app on your phone.
When using xDrip+ as receiver uninstall Dexcom app first. You cannot connect xDrip+ and Dexcom app with the transmitter at the same time!
If you need Clarity and want to profit from xDrip+ features, use the Build Your Own Dexcom App with local broadcast to xDrip+, or use xDrip+ as a Companion app receiving notifications from the official Dexcom app.
xDrip+ version depending on G6 transmitter serial no.
All G6 transmitters manufactured after fall/end 2018 are called «Firefly». They do not allow sensor restart without removing the transmitter, they do not send raw data. It is recommended to use the latest Nightly Snapshot.
Old rebatteried transmitters and modified trasmitters allow sensor life extension and restarts, they also send raw data. You can use the latest APK (stable).
Dexcom specific settings
Follow these instructions to setup xDrip+.
Preemptive restarts not recommended
Only rebatteried or modified Dexcom transmitters. Preemptive restarts do not work with standard transmitters and will stop the sensor completely: you need to remove the transmitter to restart the sensor.
The automatic extension of Dexcom sensors (preemptive restarts) is not recommended as this might lead to “jumps” in BG values on day 9 after restart.
To use it safely, there are a few points to be aware of:
If you are using the native data with the calibration code in xDrip+ or Spike, the safest thing to do is not allow preemptive restarts of the sensor.
If you must use preemptive restarts, then make sure you insert at a time of day where you can observe the change and calibrate if necessary.
If you are restarting sensors, either do it without the factory calibration for safest results on days 11 and 12, or ensure you are ready to calibrate and keep an eye on variation.
Pre-soaking of the G6 with factory calibration is likely to give variation in results. If you do pre-soak, then to get best results, you will probably need to calibrate the sensor.
If you aren’t being observant about the changes that may be taking place, it may be better to revert to non-factory-calibrated mode and use the system like a G5.
To learn more about the details and reasons for these recommendations read the complete article published by Tim Street at www.diabettech.com.
Connect G6 transmitter for the first time
For second and following transmitters see Extend transmitter life below.
Follow these instructions.
Transmitter battery status
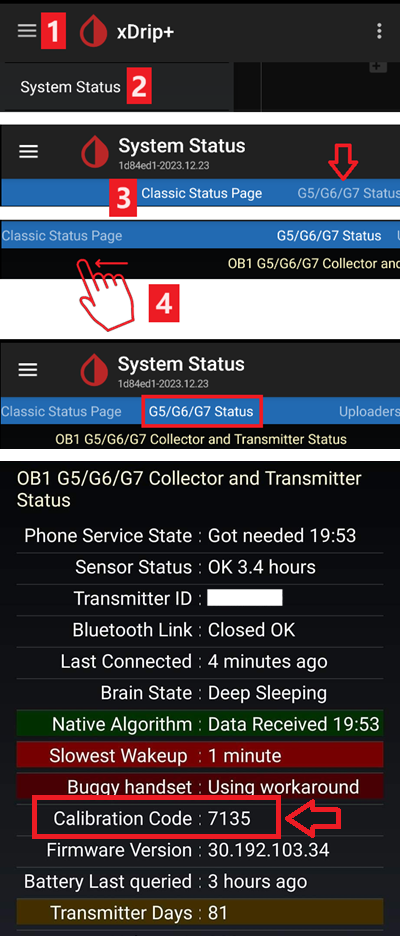
Battery status can be controlled in system status
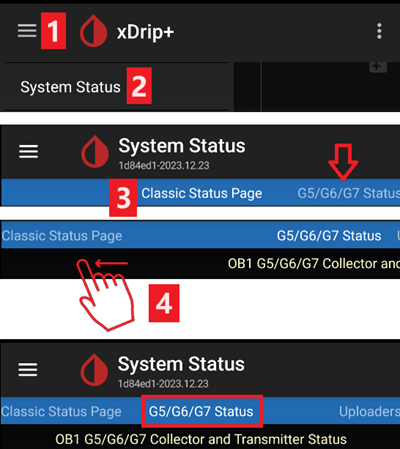
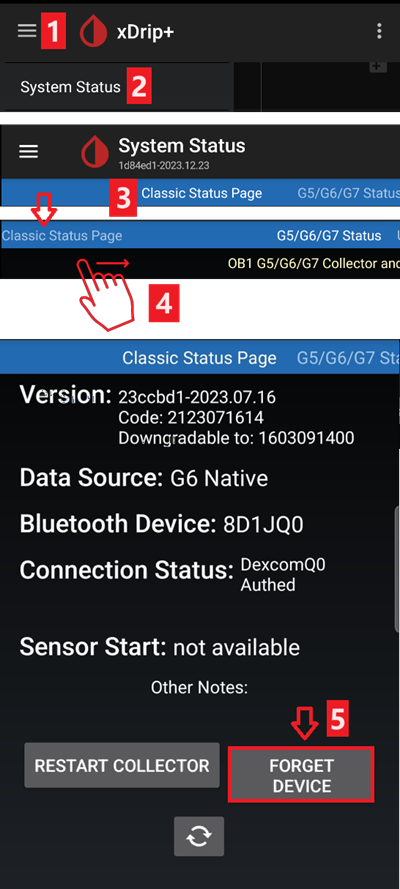
→ Hamburger Menu (1) → System Status (2) → If you are on the Classic Status Page (3) swipe the screen (4) to reach → G5/G6/G7 Status screen.
See here for more information.
Extend transmitter life
Lifetime cannot be extended for Firefly transmitters: only rebatteried or modified transmitters.
Follow these instructions for non-Firefly transmitters.
Replace transmitter
Turn original Dexcom receiver off (if used).
Stop sensor (only if replacing sensor).
Forget device in xDrip+ system status AND in smartphone’s BT settings (Will be shown as Dexcom?? whereas ?? are the last two digits of the transmitter serial no.)
→ Hamburger Menu (1) → System Status (2) → If you are on the Classic Status Page (3) swipe the screen (4) to reach → G5/G6/G7 Status screen → Forget Device (5).
Remove transmitter (and sensor if replacing sensor). To remove transmitter without removing sensor see this, or this video https://youtu.be/AAhBVsc6NZo.
Put the old transmitter far away to prevent reconnection. A microwave is a perfect Faraday shield for this - but unplug power cord to be 100% sure no one is turning the microwave on.
Follow these instructions.
Do not turn original Dexcom receiver (if used) back on before xDrip+ shows first readings.
New Sensor
Turn original Dexcom receiver off (if used).
Stop sensor following these instructions.
Insert and then start a new sensor following these instructions.
Retrieve sensor code
→ Hamburger Menu (1) → System Status (2) → If you are on the Classic Status Page (3) swipe the screen (4) to reach → G5/G6/G7 Status screen → Calibration Code.
Troubleshooting Dexcom G5/G6 and xDrip+
Problem connecting transmitter
Follow these instructions.
Problem when starting new sensor
Follow these instructions.
Libre 1
Setup your NFC to Bluetooth bridge in xDrip+
→ Hamburger Menu (1) → Settings (2) → Less common settings (3) → Bluetooth Settings (4)
In Bluetooth Settings set the checkboxes exactly as in the screenshots below (5)
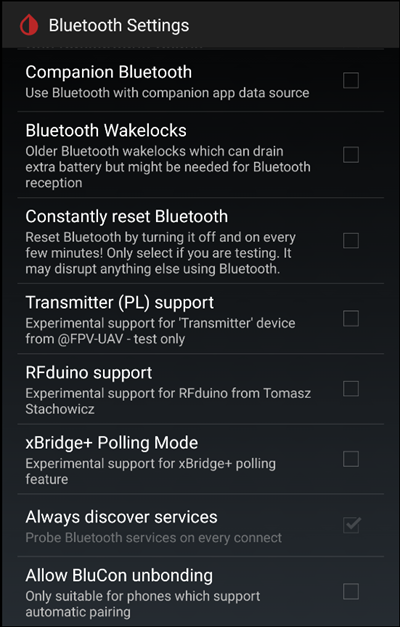
Disable watchdogs as they will reset the phone Bluetooth and interrupt your pump connection.
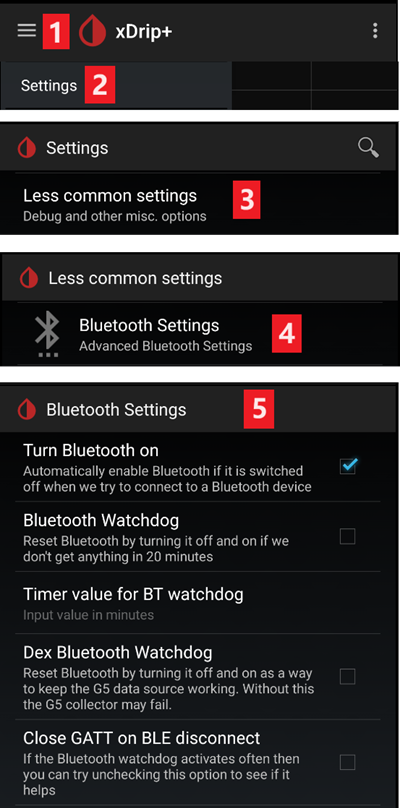
You can try to enable the following settings (7)
Use scanning
Trust Auto-Connect
Use Background Scans
If you easily lose connection to the bridge or have difficulties recovering connection, DISABLE THEM (8).
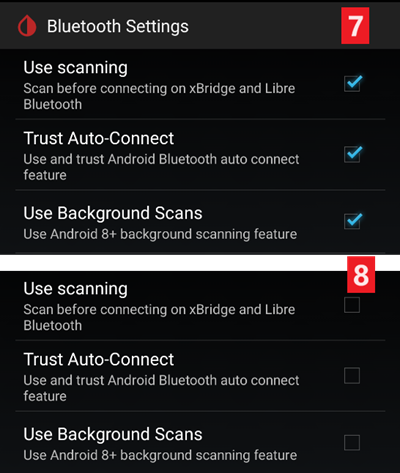
Leave all other options disabled unless you know why you want to enable them.
Libre smart reader battery level
Battery level of bridges such as MiaoMiao and Bubble can be displayed in AAPS (not Blucon).
Details can be found on screenshots page.
Connect Libre Transmitter & start sensor
If your sensor requires it (Libre 2 EU and Libre 1 US) install the latest out of process algorithm.
Your sensor must be already started using the vendor app or the reader (xDrip+ cannot start or stop Libre sensors).
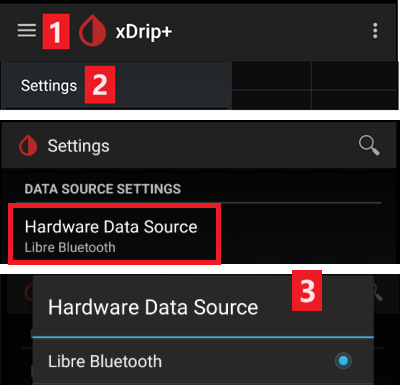
Set the data source to Libre Bluetooth.
→ Hamburger Menu (1) → Settings (2) → Select Libre Bluetooth in Hardware Data source (3)
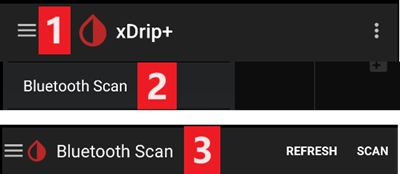
Scan Bluetooth and connect the bridge.
→ Hamburger Menu (1) → Scan Bluetooth (2) → Scan (3)
If xDrip+ can’t find the bridge, make sure it’s not connected to the vendor app. Put it in charge and reset it.
Start the sensor in xDrip+.
Safety warning
Do not use sensor data before the one hour warm-up is over: the values can be extremely high and cause wrong decisions in AAPS.
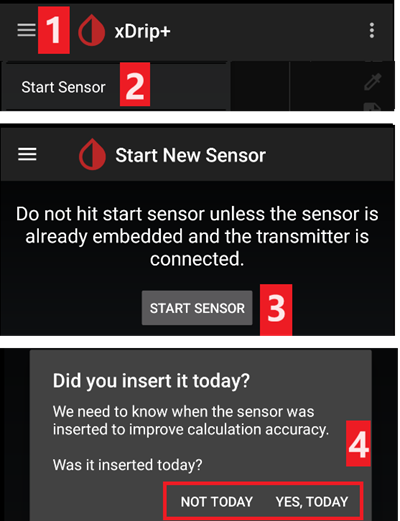
→ Hamburger Menu (1) → Start sensor (2) → Start sensor (3) → Set the exact time you started it with the reader or the vendor app. If you didn’t start it today, answer «Not Today» (4).
Libre 2 patched app
Set the data source to Libre patched app.
→ Hamburger Menu (1) → Settings (2) → Select Libre (patched App) in Hardware Data source (3)

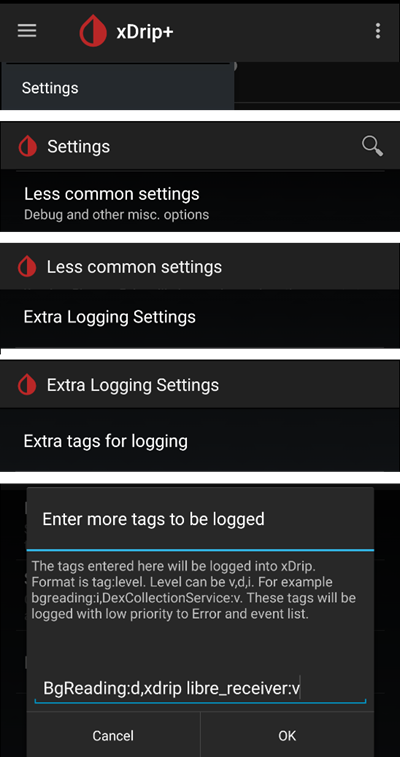
You can add
BgReading:d,xdrip libre_receiver:vunder Less Common Settings->Extra Logging Settings->Extra tags for logging. This will log additional error messages for trouble shooting.