הגדרות xDrip+
If not already set up, then download xDrip+.
Disable battery optimization and allow background activity for the xDrip+ app.
You can safely download the latest APK (stable) unless you need recent features or are using sensors that are being actively integrated (like G7), in which case you should use the latest Nightly Snapshot.
הגדרות בסיסיות לכל סוגי החיישנים
Disable Nightscout upload
Starting with AAPS 3.2, you shouldn’t let any other app upload data (blood glucose and treatments) to Nightscout.
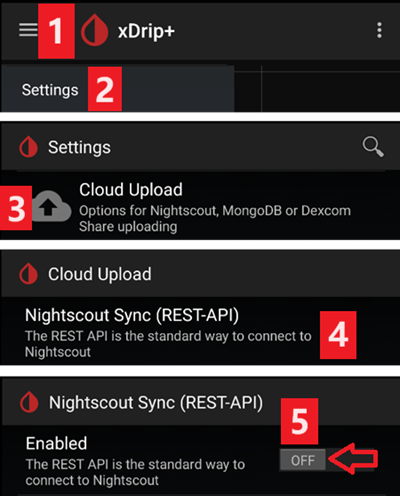
→ Hamburger Menu (1) → Settings (2) → Cloud Upload (3) -> Nightscout Sync (REST-API)(4) → Switch OFF Enabled (5)
Disable automatic calibration and treatments
If you use an older version of AAPS (before 3.2), make sure to deactivate Automatic Calibration (7) If the checkbox for Automatic Calibration is checked, activate Download treatments (6) once, then remove the checkbox for Automatic Calibration and deactivate Download treatments again.
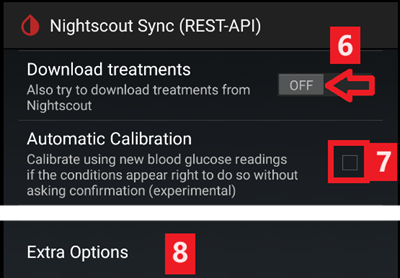
Tap Extra Options(8)
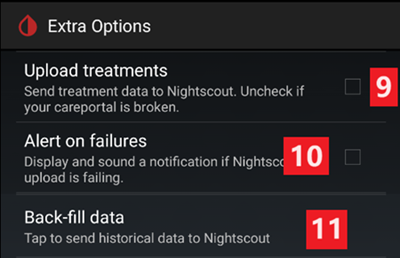
Deactivate Upload treatments(9) and make sure you will NOT use Back-fill data (11).
Option Alert on failures should also be deactivated (10). Otherwise you will get an alarm every 5 minutes in case Wi-Fi/mobile network issues or if the server is not available.
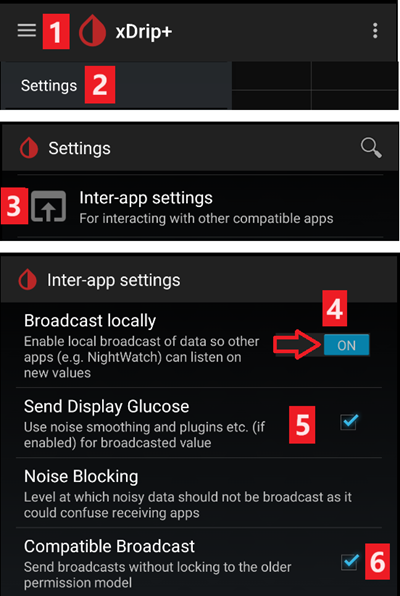
Inter-app Settings (Broadcast)
If you are going to use AAPS and the data should be forwarded to i.e. AAPS you have to activate broadcasting in xDrip+ in Inter-App settings.
→ Hamburger Menu (1) → Settings (2) → Inter-app settings (3) → Broadcast locally ON (4)
In order for the values to be identical in AAPS with respect to xDrip+, you should activate Send the displayed glucose value (5).
Enable Compatible Broadcast (6).
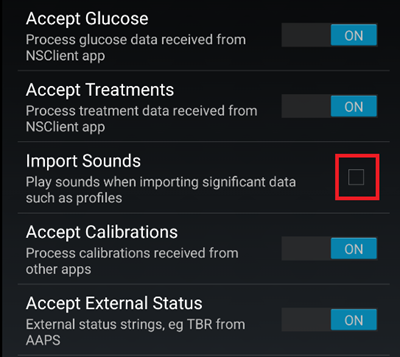
If you have also activated Accept treatments in xDrip+ and Enable broadcasts to xDrip+ in AAPS xDrip+ plugin, then xDrip+ will receive insulin, carbs and basal rate information from AAPS.
If you enable Accept Calibrations, xDrip+ will use the calibrations from AAPS. Be careful when you use this feature with Dexcom sensors: read this first.
Remember to disable Import Sounds to avoid xDrip+ making a ringtone every time AAPS sends a basal/profile change.
זיהוי מקלט
If you discover problems with local broadcast (AAPS not receiving BG values from xDrip+) go to → Hamburger Menu (1) Settings (2) → Inter-app settings (3) → Identify receiver (7) and enter
info.nightscout.androidapsfor AAPS build (if you are using PumpControl build, please enterinfo.nightscout.aapspumpcontrolinstead!!).שימו לב: תיקון אוטומטי נוטה לפעמים לשנות את האות הראשונה לאות גדולה. יש להשתמש רק באותיות קטנות בעת הקלדת
info.nightscout.androidaps(אוinfo.nightscout.aapspumpcontrolעבור PumpControl). אותיות גדולות מונעות מ-AAPS לקבל את ערכי הסוכר מ-xDrip+.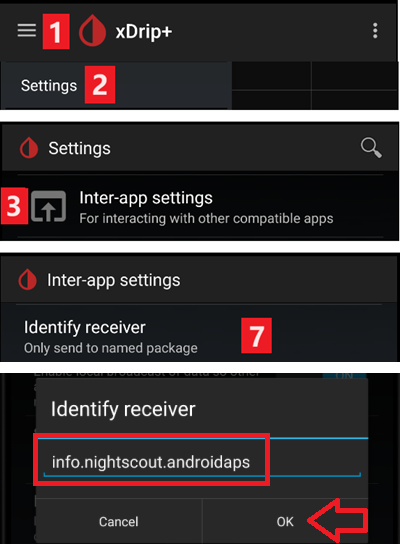
Use AAPS to calibrate in xDrip+
If you want to be able to use AAPS to calibrate then in xDrip+ go to Settings → Interapp Compatibility → Accept Calibrations and select ON.
You may also want to review the options in Settings → Less Common Settings → Advanced Calibration Settings.
Dexcom G6
ניתן לחבר בו-זמנית משדר דקסקום G6 למקלט דקסקום (או לחילופין את המשאבה t:slim) ואפליקציה אחת בטלפון.
בעת שימוש ב-xDrip+ כמקלט הסירו תחילה את אפליקציית דקסקום. לא ניתן לחבר את xDrip+ וגם את אפליקציית דקסקום למשדר בו-זמנית!
If you need Clarity and want to profit from xDrip+ features, use the Build Your Own Dexcom App with local broadcast to xDrip+, or use xDrip+ as a Companion app receiving notifications from the official Dexcom app.
גרסת xDrip+ בהתאם למספר הסידורי של משדר G6
All G6 transmitters manufactured after fall/end 2018 are called ”Firefly“. They do not allow sensor restart without removing the transmitter, they do not send raw data. It is recommended to use the latest Nightly Snapshot.
Old rebatteried transmitters and modified trasmitters allow sensor life extension and restarts, they also send raw data. You can use the latest APK (stable).
הגדרות ספציפיות לדקסקום
Follow these instructions to setup xDrip+.
אתחול מונע לא מומלץ
Only rebatteried or modified Dexcom transmitters. Preemptive restarts do not work with standard transmitters and will stop the sensor completely: you need to remove the transmitter to restart the sensor.
הארכה אוטומטית של חיישני דקסקום (preemptive restarts) אינה מומלצת מכיוון שהדבר עלול להוביל ל“קפיצות ”בערכי הסוכר ביום התשיעי לאחר ההפעלה מחדש.
כדי להשתמש בו בבטחה, יש לשים לב למספר נקודות:
אם אתם משתמשים בנתונים הנאטיביים (Native Data) עם קוד הכיול ב-xDrip+ או ב-Spike, הדבר הבטוח ביותר שאפשר לעשות הוא לא לאפשר הפעלה מחדש של החיישן.
אם אתם מוכרחים להשתמש באתחול מונע, הקפידו להפעיל זאת בזמן ביום בו תוכלו לצפות בשינוי ולכייל במידת הצורך.
אם אתם מפעילים מחדש חיישנים, בצעו זאת ללא כיול המפעל לקבלת התוצאות הבטוחות ביותר בימים 11 ו -12, או וודאו שאתם מוכנים לכייל ולשים עין על סטיות.
”השרייה“ מוקדמת של ה-G6 (הדבקת חיישן מבלי להפעילו למספר שעות) עם כיול המפעל עשויה לגרום סטיה בתוצאות. אם אתם עושים השרייה מוקדמת, כדי לקבל את התוצאות הטובות ביותר, סביר להניח שתצטרכו לכייל את החיישן.
אם אינכם מקפידים לפקח על השינויים שעלולים להתרחש, אולי עדיף לחזור למצב שאינו מכויל ע“H היצרן ולהשתמש במערכת כמו G5.
למידע נוסף על הפרטים והסיבות להמלצות אלה קראו את המאמר המלא שפרסם טים סטריט בכתובת www.diabettech.com.
חיבור משדר G6 בפעם הראשונה
**עבור משדרים שניים וכו«, ראו הארכת חיי המשדר להלן. **
Follow these instructions.
מצב סוללת המשדר
Battery status can be controlled in system status
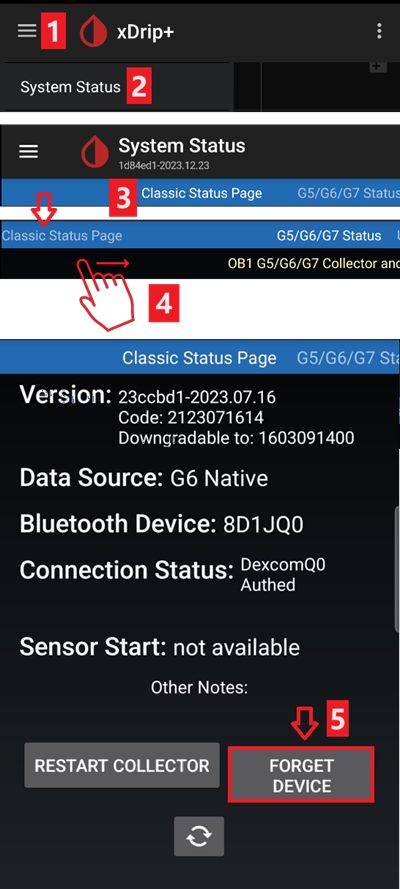
→ Hamburger Menu (1) → System Status (2) → If you are on the Classic Status Page (3) swipe the screen (4) to reach → G5/G6/G7 Status screen.

See here for more information.
הארכת חיי המשדר
Lifetime cannot be extended for Firefly transmitters: only rebatteried or modified transmitters.
Follow these instructions for non-Firefly transmitters.
החלפת משדר
כבו את מקלט דקסקום המקורי (אם נעשה בו שימוש).
Stop sensor (only if replacing sensor).
לחצו על ”שכח מכשיר“ במסך סטטוס המערכת וגם מחקו את המשדר מהגדרות חיבור הבלוטות« (יופיע כ-DexcomXX כך ש- are the last two digits of the transmitter serial no.)
→ Hamburger Menu (1) → System Status (2) → If you are on the Classic Status Page (3) swipe the screen (4) to reach → G5/G6/G7 Status screen → Forget Device (5).
Remove transmitter (and sensor if replacing sensor). To remove transmitter without removing sensor see this, or this video https://youtu.be/AAhBVsc6NZo.
הרחיקו את המשדר כדי למנוע חיבור לטלפון. A microwave is a perfect Faraday shield for this - but unplug power cord to be 100% sure no one is turning the microwave on.
Follow these instructions.
אל תפעיל את מקלט הדקסקום המקורי (אם יש) לפני ש-xDrip+ יציג נתוני סוכר ראשונים.
חיישן חדש
כבו את מקלט דקסקום המקורי (אם נעשה בו שימוש).
Stop sensor following these instructions.
Insert and then start a new sensor following these instructions.
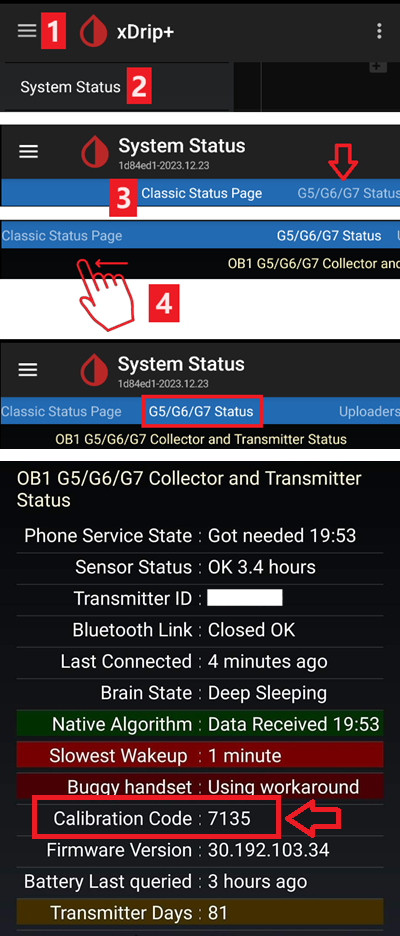
אחזור קוד חיישן
→ Hamburger Menu (1) → System Status (2) → If you are on the Classic Status Page (3) swipe the screen (4) to reach → G5/G6/G7 Status screen → Calibration Code.
פתרון בעיות דקסקום G5/G6 ו-xDrip+
בעיה בחיבור משדר
Follow these instructions.
בעיה בהפעלת חיישן חדש
Follow these instructions.
Libre 1
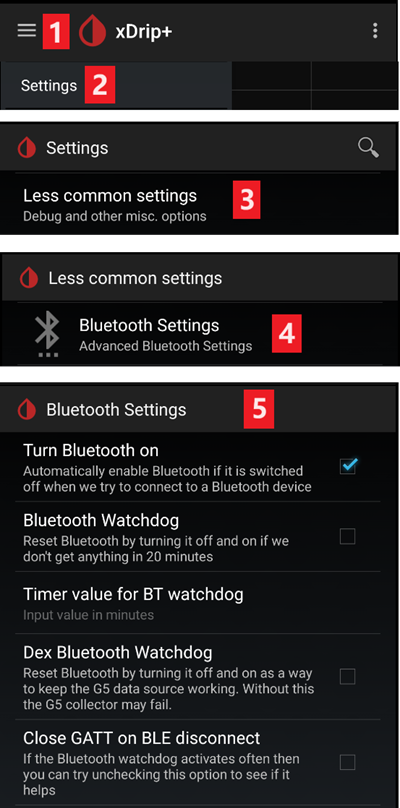
Setup your NFC to Bluetooth bridge in xDrip+
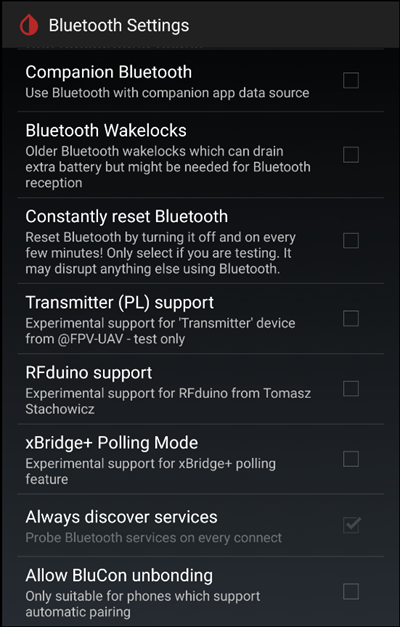
→ Hamburger Menu (1) → Settings (2) → Less common settings (3) → Bluetooth Settings (4)
In Bluetooth Settings set the checkboxes exactly as in the screenshots below (5)
Disable watchdogs as they will reset the phone Bluetooth and interrupt your pump connection.
You can try to enable the following settings (7)
השתמש בסריקה
Trust Auto-Connect
Use Background Scans
If you easily lose connection to the bridge or have difficulties recovering connection, DISABLE THEM (8).
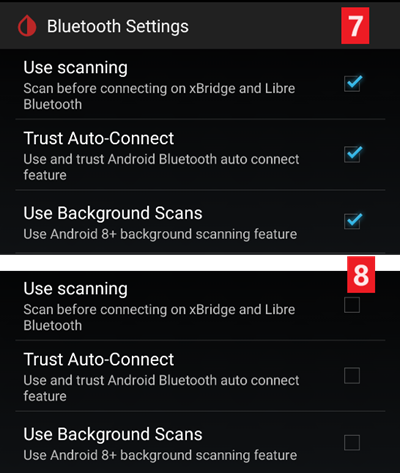
Leave all other options disabled unless you know why you want to enable them.
רמת סוללה של קורא חכם של Libre
Battery level of bridges such as MiaoMiao and Bubble can be displayed in AAPS (not Blucon).
ניתן למצוא פרטים בדף צילומי המסך.
חיבור משדר Libre והפעלת חיישן
If your sensor requires it (Libre 2 EU and Libre 1 US) install the latest out of process algorithm.
Your sensor must be already started using the vendor app or the reader (xDrip+ cannot start or stop Libre sensors).
Set the data source to Libre Bluetooth.
→ Hamburger Menu (1) → Settings (2) → Select Libre Bluetooth in Hardware Data source (3)

Scan Bluetooth and connect the bridge.
→ Hamburger Menu (1) → Scan Bluetooth (2) → Scan (3)
If xDrip+ can’t find the bridge, make sure it’s not connected to the vendor app. Put it in charge and reset it.

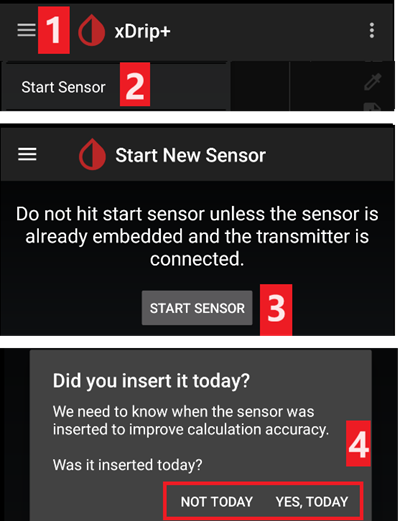
Start the sensor in xDrip+.
→ Hamburger Menu (1) → Start sensor (2) → Start sensor (3) → Set the exact time you started it with the reader or the vendor app. If you didn’t start it today, answer ”Not Today“ (4).
Libre 2 patched app
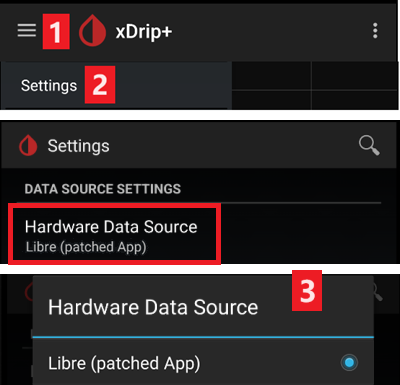
Set the data source to Libre patched app.
→ Hamburger Menu (1) → Settings (2) → Select Libre (patched App) in Hardware Data source (3)
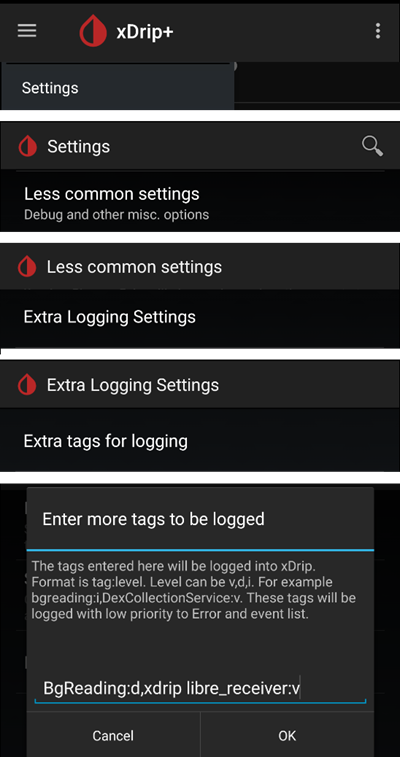
You can add
BgReading:d,xdrip libre_receiver:vunder Less Common Settings->Extra Logging Settings->Extra tags for logging. This will log additional error messages for trouble shooting.