Veelgestelde vragen
Om vragen toe te voegen aan de Veelgestelde Vragen: volg deze instructies
Algemeen
Kan ik de AndroidAPS app gewoon downloaden?
Nee. Er is geen downloadbaar apk bestand voor AndroidAPS. Je moet het zelf bouwen. Omdat:
AndroidAPS wordt gebruikt om je pomp te bedienen en insuline te geven. Under current regulations in Europe, all systems classed as IIa or IIb are medical devices that require regulatory approval (a CE mark) which needs various studies and sign offs. Het verspreiden van een ongereguleerd medisch hulpmiddel is illegaal. In andere delen van de wereld bestaat vergelijkbare regelgeving.
This regulation is not restricted just to sales (in the meaning of getting money for something) but applies to any distribution (even giving away for free). Building a medical device for yourself is the only way to use the app within these regulations.
Dat is waarom een kant-en-klare app niet verspreid mag worden.
Hoe begin ik?
Ten eerste, moet je alle fysieke onderdelen van een closed loop verzamelen:
een Android smartphone (Apple iOS wordt niet ondersteund door AndroidAPS - je kunt wel iOS Loop gebruiken) en
Ten tweede, moet je de fysieke onderdelen instellen. Zie het gebruiksvoorbeeld met stap voor stap instructies.
Ten derde, moet je alle software bouwen en instellen: AndroidAPS en CGM/FGM bron.
Ten vierde moet je leren en begrijpen hoe het algoritme is ontworpen om jouw behandel instellingen correct in te kunnen stellen. Het grondbeginsel van closed loopen is dat jouw basaalstanden en koolhydraatratio’s correct zijn. Alle aanpassingen die de closed loop doet, gaan er vanuit dat jouw basaalstand klopt. Alle pieken en dalen die je ziet zijn dus een gevolg van andere, tijdelijke factoren (beweging, stress etc) die dan worden opgelost met een tijdelijke insulineaanpassing. De aanpassingen die de closed loop kan maken zijn uit veiligheid beperkt (zie maximaal toegestane basaalstand in OpenAPS Reference Design). Dit betekent dat je de closed loop niet moet inzetten om een fout afgestelde basaalstand te verhelpen. Wanneer je bijvoorbeeld vaak een lage waarde hebt vlak voor een maaltijd, dan moet waarschijnlijk je basaal omlaag. Je kunt autotune aan de hand van een grote hoeveelheid gegevens, suggesties laten doen voor verbeteringen aan je basaalstanden, ISF en/of koolhydraatratio. Of je kunt je basaalstanden op de ouderwetse manier testen en instellen.
Zijn er nog praktische tips?
Wachtwoordbeveiliging
Als je niet wilt dat jouw instellingen gemakkelijk worden aangepast, dan kun je het instellingen menu voorzien van een wachtwoord. Ga naar “Wachtwoord voor instellingen” in het instellingen menu en typ een zelfgekozen wachtwoord. De volgende keer dat je het instellingen menu opent, moet je het wachtwoord intypen om verder te kunnen. Wanneer je later geen wachtwoord meer wilt gebruiken, ga dan naar het “Wachtwoord voor instellingen” veld en verwijder de tekst.
Android Wear Smartwatches
Wanneer je in de toekomst de Android Wear app wilt gebruiken om vanaf een smartwatch te kunnen bolussen of instellingen te wijzigen, dan moet je instellen dat notificaties van AndroidAPS niet geblokkeerd worden. Bevestiging van opdrachten die je op je smartwatch invoert, komen namelijk via een notificatie binnen op je telefoon.
Pomp afkoppelen
If you take your pump off for showering, bathing, swimming, sports or other activities you must let AndroidAPS know that no insulin is delivered to keep IOB correct.
The pump can be disconnected using the Loop Status icon on the AndroidAPS Home Screen.
Aanbevelingen niet alleen gebaseerd op één enkele CGM-waarde
For safety, recommendations made are based on not one CGM reading but the average delta. Therefore, if you miss some readings it may take a while after getting data back before AndroidAPS kicks in looping again.
Leestips
There are several blogs with good tips to help you understand the practicalities of looping:
Fine-tuning Settings See my CGM
Why DIA matters See my CGM
Limiting meal spikes #DIYPS
Hormones and autosens See my CGM
Welke spullen moet ik bij me hebben voor noodgevallen?
You have to have the same emergency equipment with you like every other T1D with insulin pump therapy. When looping with AndroidAPS it is strongly recommended to have the following additional equipment with or near to you:
Battery pack and cables to charge your smartphone, watch and (if needed) BT reader or Link device
Pump batteries
Current apk and preferences files for AndroidAPS and any other apps you use (e.g. xDrip+, BYO Dexcom) both locally and in the cloud (Dropbox, Google Drive).
How can I safely and securely attach the CGM/FGM?
You can tape it. There are several pre-perforated ‘overpatches’ for common CGM systems available (search Google, eBay or Amazon). Some loopers use the cheaper standard kinesiology tape or rocktape.
You can fix it. You can also purchase upper arm bracelets that fix the CGM/FGM with a band (search Google, eBay or Amazon).
AndroidAPS instellingen
The following list aims to help you optimize settings. It may be best to start at the top and work to the bottom. Aim to get one setting right before changing another. Work in small steps rather than making large changes at once. You can use Autotune to guide your thinking, although it should not be followed blindly: it may not work well for you or in all circumstances. Note that settings interact with one another - you can have ‘wrong’ settings that work well together in some circumstances (e.g. if a too-high basal happens to be at the same time as a too-high CR) but do not in others. This means that you need to consider all the settings and check they work together in a variety of circumstances.
Duur van insuline activiteit (DIA)
Beschrijving & testen
The length of time that insulin decays to zero.
This is quite often set too short. Most people will want at least 5 hours, potentially 6 or 7.
Invloed op BG
Too short DIA can lead to low BGs. En omgekeerd.
If DIA is too short, AAPS thinks too early that your previous bolus is all consumed, and, at still elevated glucose, will give you more. (Actually, it does not wait that long, but predicts what would happen, and keeps adding insulin). This essentially creates ‘insulin stacking’ that AAPS is unaware of.
Example of a too-short DIA is a high BG followed by AAPS over-correcting and giving a low BG.
Basaalstanden (E/uur)
Beschrijving & testen
The amount of insulin in a given hour time block to maintain BG at a stable level.
Test your basal rates by suspending loop, fasting, waiting for say 5 hours after food, and seeing how BG changes. Repeat a few times.
If BG is dropping, basal rate is too high. En omgekeerd.
Invloed op BG
Too high basal rate can lead to low BGs. En omgekeerd.
AAPS ‘baselines’ against the default basal rate. If basal rate is too high, a ‘zero temp’ will count as a bigger negative IOB than it should. This will lead to AAPS giving more subsequent corrections than it should to bring IOB ultimately to zero.
So, a basal rate too high will create low BGs both with the default rate, but also some hours hence as AAPS corrects to target.
Conversely a basal rate too low can lead to high BGs, and a failure to bring levels down to target.
Insuline gevoeligheids factor (Insulin Sensitivity Factor, ISF) (mmol/l/E of mg/dl/E)
Beschrijving & testen
The drop in BG expected from dosing 1U of insulin.
Assuming correct basal, you can test this by suspending loop, checking IOB is zero, and taking a few glucose tablets to get to a stable ‘high’ level.
Then take an estimated amount of insulin (as per current 1/ISF) to get to your target BG.
Be careful as this is quite often set too low. Too low means 1 U will drop BG faster than expected.
Invloed op BG
Lower ISF (i.e. 40 instead of 50) meaning insulin drops your BG less per unit. This leads to a more aggressive / stronger correction from the loop with more insulin. If the ISF is too low, this can lead to low BGs.
Higher ISF (i.e. 45 instead of 35) meaning insulin drops your BG more per unit. This leads to a less aggressive / weaker correction from the loop with less insulin. If the ISF is too high, this can lead to high BGs.
Voorbeeld:
BG is 190 mg/dl (10,5 mmol) and target is 100 mg/dl (5,6 mmol).
So, you want correction of 90 mg/dl (= 190 - 110).
ISF = 30 -> 90 / 30 = 3 units of insulin
ISF = 45 -> 90 / 45 = 2 units of insulin
An ISF that is too low (not uncommon) can result in ‘over corrections’, because AAPS thinks it needs more insulin to correct a high BG than it actually does. This can lead to ‘roller coaster’ BGs (esp. when fasting). In this circumstance you need to increase your ISF. This will mean AAPS gives smaller correction doses, and this will avoid over-correcting a high BG resulting in a low BG.
Conversely, an ISF set too high can result in under-corrections, meaning your BG remains above target – particularly noticeable overnight.
Koolhydraat ratio (KH) (g/E)
Beschrijving & testen
The grams of carbohydrate for each unit of insulin.
Some people also use I:C as abbreviation instead of IC or talk about carb ratio (CR).
Assuming correct basal, you can test by checking IOB is zero and that you are in-range, eating exactly known carbs, and take an estimated amount of insulin based on current insulin to carb ratio. Best is to eat food your normally eat at that time of day and count its carbs precisely.
Opmerking:
In sommige Europese landen werden/worden broodeenheden (ookwel: broodwaarden of koolhydraten porties) gebruikt om te berekenen hoeveel insuline nodig is voor een bepaalde hoeveelheid voedsel. At the beginning 1 bread unit equal to 12g of carbs, later some changed to 10g of carbs.
Bij gebruik van broodenheden is de hoeveelheid koolhydraten een vast getal, waarbij de hoeveelheid insuline varieert per persoon. (“Hoeveel insuline is nodig voor één broodeenheid?”)
Bij gebruik van KH ratio’s (insuline:koolhydraat ratio’s) is de hoeveelheid insuline een vast getal, en de hoeveelheid koolhydraten varieert per persoon. (“Hoeveel gram koolhydraten kan iemand eten bij één eenheid insuline?”)
Voorbeeld:
Bread unit factor (BU = 12g carbs): 2,4 U/BU -> You need 2,4 units of insulin when you eat one bread unit.
Bijbehorende KH ratio: 12,5/2,4 = 5,2 g/E -> je kunt 5,2g koolhydraten eten bij één eenheid insuline.
BE factor 2,4E /12,5g ===> KH ratio = 12,5g/2,4E = 5,2 g/E
Conversietabellen zijn online beschikbaar, bijvoorbeeld hier (in het Duitse systeem. Let op: daar gebruiken ze vaak dat 1 BE = 12g koolhydraten!).
Invloed op BG
Lower IC = less food per unit, i.e. you are getting more insulin for a fixed amount of carbs. Can also be called ‘more aggressive’.
Higher IC = more food per unit, i.e. you are getting less insulin for a fixed amount of carbs. Can also be called ‘less aggressive’.
If after meal has digested and IOB has returned to zero, your BG remains higher than before food, chances are IC is too large. Conversely if your BG is lower than before food, IC is too small.
APS algoritme
Waarom zie ik “dia:3” in de “OPENAPS AMA”-tab ook al heb ik een andere DIA in mijn profiel?
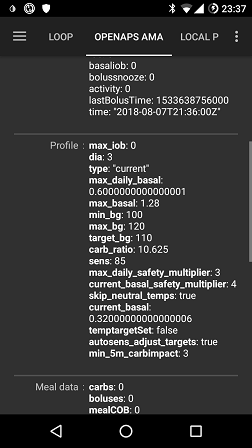
In AMA, DIA actually doesn’t mean the ‘duration of insulin acting’. It is a parameter, which used to be connected to the DIA. Now, it means, ‘in which time should the correction be finished’. It has nothing to do with the calculation of the IOB. In OpenAPS SMB, there is no need for this parameter any longer.
Profiel
Waarom minimaal een 5 uur DIA (Duur van Insuline Actie) gebruiken in plaats van 2-3 uur?
Well explained in this article. Don’t forget to ACTIVATE PROFILE after changing your DIA.
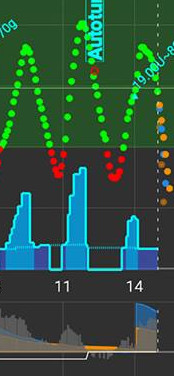
Waarom zorgt de loop ervoor dat mijn bloedsuiker vaak zo ver zakt dat ik een hypo krijg, terwijl mijn COB (koolhydraten aan boord) nul is?
First of all, check your basal rate and make a no-carb basal rate test. If it is correct, this behavior is typically caused by a too low ISF. A too low ISF looks typically like this:
Waarom heb ik hoge glucosepieken na een maaltijd terwijl ik een closed loop gebruik?
First of all, check your basal rate and make a no-carb basal rate test. If it is correct and your BG is falling to your target after carbs are fully absorbed, try to set an ‘eating soon’ temp target in AndroidAPS some time before the meal or think about an appropriate prebolus time with your endocrinologist. If your BG is too high after the meal and still too high after carbs are fully absorbed, think about decreasing your IC with your endocrinologist. If your BG is too high while COB and too low after carbs are fully absorbed, think about increasing your IC and an appropriate prebolus time with your endocrinologist.
Overige instellingen
Nightscout instellingen
AndroidAPS NSClient zegt ‘Not allowed’ (niet toegestaan) en wil geen gegevens uploaden. Wat kan ik doen?
In NSClient check ‘Connection settings’. Maybe you actually are not in an allowed WLAN or you have activated ‘Only if charging’ and your charging cable is not attached.
CGM instellingen
Waarom zegt AndroidAPS dat ‘de gekozen BG bron geen optimale filtering toepast’?
If you do use another CGM/FGM than Dexcom G5 or G6 in xDrip native mode, you’ll get this alert in AndroidAPS OpenAPS-tab. See Smoothing blood glucose data for more details.
Pomp
Waar moet ik mijn pomp dragen?
There are innumerable possibilities to place the pump. It does not matter if you are looping or not.
Batterijen
Looping can reduce the pump battery faster than normal use because the system interacts through bluetooth far more than a manual user does. It is best to change battery at 25% as communication becomes challenging then. You can set warning alarms for pump battery by using the PUMP_WARN_BATT_P variable in your Nightscout site. Tricks to increase battery life include:
reduce the length of time the LCD stays on (within pump settings menu)
reduce the length of time the backlight stays on (within pump settings menu)
select notification settings to a beep rather than vibrate (within pump settings menu)
only press the buttons on the pump to reload, use AndroidAPS to view all history, battery level and reservoir volume.
AndroidAPS app may often be closed to save energy or free RAM on some phones. When AndroidAPS is reinitialized at each startup it establishes a Bluetooth connection to the pump, and re-reads the current basal rate and bolus history. This consumes battery. To see if this is happening, go to Preferences > NSClient and enable ‘Log app start to NS’. Nightscout will receive an event at every restart of AndroidAPS, which makes it easy to track the issue. To reduce this happening, whitelist AndroidAPS app in the phone battery settings to stop the app power monitor closing it down.
For example, to whitelist on a Samsung phone running Android Pie:
Go to Settings -> Device Care -> Battery
Scroll until you find AndroidAPS and select it
De-select “Put app to sleep”
ALSO go to Settings -> Apps -> (Three circle symbol in the top-right of the screen) select “special access” -> Optimize battery usage
Scroll to AndroidAPS and make sure it is de-selected.
clean battery terminals with alcohol wipe to ensure no manufacturing wax/grease remains.
for Dana R/RS pumps the startup procedure draws a high current across the battery to purposefully break the passivation film (prevents loss of energy whilst in storage) but it doesn’t always work to break it 100%. Either remove and reinsert battery 2-3 times until it does show 100% on screen, or use battery key to briefly short circuit battery before insertion by applying to both terminals for a split second.
see also more tips for particular types of battery
Verwisselen van reservoirs en canules
The change of cartridge cannot be done via AndroidAPS but must be carried out as before directly via the pump.
Long press on “Open Loop”/”Closed Loop” on the Home tab of AndroidAPS and select ‘Suspend Loop for 1h’
Now disconnect the pump and change the reservoir as per pump instructions.
Also priming and filling tube and cannula can be done directly on the pump. In this case use PRIME/FILL button in the actions tab just to record the change.
Once reconnected to the pump continue the loop by long pressing on ‘Suspended (X m)’.
The change of a cannula however does not use the “prime infusion set” function of the pump, but fills the infusion set and/or cannula using a bolus which does not appear in the bolus history. This means it does not interrupt a currently running temporary basal rate. On the Actions (Act) tab, use the PRIME/FILL button to set the amount of insulin needed to fill the infusion set and start the priming. If the amount is not enough, repeat filling. You can set default amount buttons in the Preferences > Other > Fill/Prime standard insulin amounts. See the instruction booklet in your cannula box for how many units should be primed depending on needle length and tubing length.
Achtergrond
You can find the AndroidAPS wallpaper for your phone on the phones page.
Dagelijks gebruik
Hygiëne
Wat te doen tijdens het douchen?
You can remove the pump while taking a shower or bath. For this short period of time you may not need it, but you should tell AAPS that you’ve disconnected so that the IOB calculations are correct. See description above.
Werk
Depending on your job, you may choose to use different treatment factors on workdays. As a looper you should consider a profile switch for your typical working day. For example, you may switch to a profile higher than 100% if you have a less demanding job (e.g. sitting at a desk), or less than 100% if you are active and on your feet all day. You could also consider a high or low temporary target or a time shift of your profile when working much earlier or later than regular, of if you work different shifts. You can also create a second profile (e.g. ‘home’ and ‘workday’) and do a daily profile switch to the profile you actually need.
Vrije tijd
Sporten
Je moet je oude gewoontes uit de pre-loop tijd afleren. Als je simpelweg evenveel extra koolhydraten neemt als voorheen bij het sporten, dan zal het systeem voor deze koolhydraten gaan corrigeren waarmee hun effect teniet wordt gedaan.
Wat je wilt is dat je extra koolhydraten kunt nemen, zonder dat de loop daarvoor de bijbehorende hoeveelheid insuline toedient.
Probeer daarvoor deze stappen:
Make a profile switch < 100%.
Set an activity temp target above your standard target.
If you are using SMB make sure “Enable SMB with high temp targets” and “Enable SMB always” are disabled.
Pre- and post-processing of these settings is important. Houd rekening met de (trage) werkingsduur van insuline, zorg dus dat je enige tijd voorafgaand aan de sport al minder insuline krijgt. Ook na het sporten kun je nog minder (of juist meer!) insuline nodig hebben.
If you do sports regularly at the same time (i.e. sports class in your gym) you can consider using automation for profile switch and TT. Je kunt de Automatisering ook op basis van GPS locatie instellen, maar dat maakt het timen voorafgaand aan sporten wel lastiger.
Het exacte percentage van de Profiel wissel, de waarde voor het Tijdelijke streefdoel en de timing van al deze instellingen zijn voor iedereen anders. Begin aan de veilige kant als je op zoek gaat naar de juiste waarde voor jou (start met een lager percentage en hoger streefdoel).
Sex
You can remove the pump to be ‘free’, but you should tell AndroidAPS so that the IOB calculations are correct. See description above.
Alcohol
Drinking alcohol is risky in closed loop mode as the algorithm cannot predict the alcohol influenced BG correctly. You have to check out your own method for treating this using the following functions in AndroidAPS:
Deactivating closed loop mode and treating the diabetes manually or
setting high temp targets and deactivating UAM to avoid the loop increasing IOB due to an unattended meal or
do a profile switch to noticeably less than 100%
When drinking alcohol, you always have to have an eye on your CGM to manually avoid a hypoglycemia by eating carbs.
Slapen
Hoe kan ik ‘s nachts closed loopen zonder mobiele of WIFI straling?
Many users turn the phone into airplane mode at night. If you want the loop to support you when you are sleeping, proceed as follows (this will only work with a local BG-source such as xDrip+ or ‘Build your own Dexcom App’, it will NOT work if you get the BG-readings via Nightscout):
Zet de telefoon in vliegtuigmodus.
Wacht totdat de vliegtuigmodus actief is.
Schakel Bluetooth in.
You are not receiving calls now, nor are you connected to the internet. But the loop is still running.
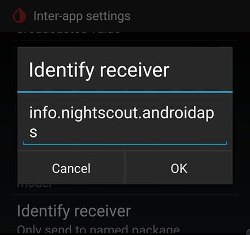
Some people have discovered problems with local broadcast (AAPS not receiving BG values from xDrip+) when phone is in airplane mode. Go to Settings > Inter-app settings > Identify receiver and enter info.nightscout.androidaps.
Reizen
Hoe kan ik wisselen van tijdzone?
With Dana R and Dana R Korean you don’t have to do anything. For other pumps see time zone travelling page for more details.
Arts en diabetesverpleegkundige
Ziekenhuis
If you want to share some information about AndroidAPS and DIY looping with your clinicians, you can print out the guide to AndroidAPS for clinicians.
Afspraak met je internist of diabetesverpleegkundige
Rapporten
You can either show your Nightscout reports (https://YOUR-NS-SITE.com/report) or check Nightscout Reporter.
Frequent questions on Discord and their answers…
My problem is not listed here.
Information to get help.
My problem is not listed here but I found the solution
Information to get help.
Remind us to add your solution to this list!
AAPS stops everyday around the same time.
Stop Google Play Protect. Check for “cleaning” apps (ie CCleaner etc) and uninstall them. AAPS / 3 dots menu / About / follow the link “Keep app running in the background” to stop all battery optimizations.
How to organize my backups ?
Export settings very regularly: after each pod change, after modifying your profile, when you have validated an objective, if you change your pump… Even if nothing changes, export once a month. Keep several old export files.
Copy on an internet drive (Dropbox, Google etc) : all the apks you used to install apps on your phone (AAPS, xDrip, BYODA, Patched LibreLink…) as well as the exported setting files from all your apps.
I have problems, errors building the app.
Please
check Troubleshooting Android Studio for typical errors and
the tipps for with a step by step walktrough.
I’m stuck on an objective and need help.
Screen capture the question and answers. Post-it on the Discord AAPS channel. Don’t forget to tell which options you choose (or not) and why. You’ll get hints and help but you’ll need to find the answers.
How to reset the password in AAPS v2.8.x ?
Open the hamburger menu, start the Configuration wizard and enter new password when asked. You can quit the wizard after the password phase.
How to reset the password in AAPS v3.x
If you forgot your password: Close AAPS. Put an empty file named PasswordReset (without any extensions) in phone_main_memory/AAPS/extra directory. Restart AAPS. The new AAPS password is the serial number of your pump. The serial for the Omnipod DASH pod is 4241. You can change the password via 3 dots menu, configuration wizard, unlock parameters.
My link/pump/pod is unresponsive (RL/OL/EmaLink…)
With some phones, there are Bluetooth disconnects from the Links (RL/OL/EmaL…).
Some also have non responsive Links (AAPS says that they are connected but the Links can’t reach or command the pump.)
The easiest way to get all these parts working together is : 1/ Delete Link from AAPS 2/ Power off Link 3/ AAPS 3 dot menu, quit AAPS 4/ Long press AAPS icon, Android menu, info on app AAPS, Force stop AAPS and then Delete cache memory (Do not delete main memory !) 4bis/ Rarely some phones may need a reboot here. You can try without reboot. 5/Power on Link 6/Start AAPS 7/Pod tab, 3 dot menu, search and connect Link
Build error: file name too long
While trying to build I get an error stating the file name is too long. Possible solutions: Move your sources to a directory closer to the root directory of your drive (e.g. “c:\src\AndroidAPS-EROS”).
From Android Studio: Make sure “Gradle” is done syncing and indexing after opening the project and pulling from GitHub. Execute a Build->Clean Project before doing a Rebuild Project. Execute File->Invalidate Caches and Restart Android Studio.
Alert: Running dev version. Closed loop is disabled
AndroidAPS is not running in “developer mode”. AAPS shows the following message: “running dev version. Closed loop is disabled”.
Make sure AndroidAPS is running in “developer mode”: Place a file named “engineering_mode” at the location “AAPS/extra”. Any file will do as long as it is properly named. Make sure to restart AndroidAPS for it to find the file and go into “developer mode”.
Hint: Make a copy of an existing logfile and rename it to “engineering_mode” (note: no file extension!).
Where can I find settings files?
Settings files will be stored on your phone’s internal storage in the directory “/AAPS/preferences”. WARNING: Make sure not to lose your password as without it you will not be able to import an encrypted settings file!
How to configure battery savings?
Properly configuring Power Management is important to prevent your Phone’s OS to suspend AndroidAPS and related app’s and services when your phone is not being used. As a result AAPS can not do its work and/or Bluetooth connections for sensor and Rileylink (RL) may be shut down causing “pump disconnected” alerts and communication errors. On the phone, go to settings->Apps and disable battery savings for: AndroidAPS xDrip or BYODA/Dexcom app The Bluetooth system app (you may need to select for viewing system apps first) Alternatively, fully disable all battery savings on the phone. As a result your battery may drain faster but it is a good way to find out if battery savings is causing your problem. The way battery savings is implemented greatly depends on the phone’s brand, model and/or OS version. Because of this it is almost impossible to give instructions to properly set battery savings for your setup. Experiment on what settings work best for you. For additional information, see also Don’t kill my app
Pump unreachable alerts several times a day or at night.
Your phone may be suspending AAPS services or even Bluetooth causing it to loose connection to RL (see battery savings) Consider configuring unreachable alerts to 120 minutes by going to the top right-hand side three-dot menu, selecting Preferences->Local Alerts->Pump unreachable threshold [min].
Where can I delete treatments in AAPS v3 ?
3 dots menu, select treatements, then 3 dots menu again and you have different options available.
Configuring and Using the NSClient remote app
AAPS can be monitored and controlled remotely via the NSClient app and optionally via the associated Wear app running on Android Wear watches. Note that the NSClient (remote) app is distinct from the NSClient configuration in AAPS, and the NSClient (remote) Wear app is distinct from the AAPS Wear app–for clarity the remote apps will be referred to as ‘NSClient remote’ and ‘NSClient remote Wear’ apps.
To enable NSClient remote functionality you must: 1) Install the NSClient remote app (the version should match the version of AAPS being used) 2) Run the NSClient remote app and proceed through the configuration wizard to grant required permissions and configure access to your Nightscout site. 3) At this point you may want to disable some of the Alarm options, and/or advanced settings which log the start of the NSClient remote app to your Nightscout site. Once this is done, NSClient remote will download Profile data from your Nightscout site, the ‘Overview’ tab will display CGM data and some AAPS data, but but may not display graph data, and will indicate that a profile isn’t yet set. 4) To activate the profile:
Enable remote profile synchronization in AAPS > NSClient > Options
Activate the profile in NSClient remote > Profile After doing so, the profile will be set, and NSClient remote should display all data from AAPS. Hint: If the graph is still missing, try changing the graph settings to trigger an update. 5) To enable remote control by the AAPS NSClient, selectively enable the aspects of AAPS (Profile changes, Temp Targets, Carbs, etc.) that you would like to be able to control remotely via AAPS > NSClient > Options . Once these changes are made, you’ll be able to remotely control AAPS via either Nightscout or NSClient remote.
If you’d like to monitor/control AAPS via the NSClient remote Wear App, you’ll need both NSClient remote and the associated Wear app to be installed. To compile the NSClient remote Wear app, follow the standard instructions for installing/configuring the AAPS wear app, except when compiling it, choose the NSClient variant.
I have a red triangle / AAPS won’t enable closed loop / Loops stays in LGS / I have a yellow triangle
The red and yellow triangles are a security feature in AAPS v3.
Red triangle means that you have duplicate BGs and AAPS can’t calculate precisely the deltas. You can’t close the loop. You need to delete one BG of each duplicated value in order to clear the red triangle. Go to BYODA or xDRIP tab, long press one line you want to delete, check one of each lines that are doubled (or via 3 dots menu and Delete, depending on your AAPS version). You may need to reset the AAPS databases if there are too many double BGs. In this case, you’ll also loose stats, IOB, COB, selected profile.
Possible origin of the problem: xDrip and/or NS backfilling BGs.
The yellow triangle means unstable delay between each BG reading. You don’t receive BGs every 5 min regularly or missing BGs. It is often a Libre problem. It also happens when you change G6 transmitter. If the yellow triangle is related to the G6 tansmitter change, it will go away by itself after several hours (around 24h). In case of Libre, the yellow triangle will stay. The loop can be closed and works correctly.
Can I move an active DASH Pod to other hardware?
This is possible. Note that as moving is “unsupported” and “untested” there is some risk involved. Best to try the procedure when your Pod is about to expire so when things go wrong not much is lost.
Critical is that pump “state” (which includes it’s MAC address) in AAPS and DASH match on reconnecting
Procedure I follow in this:
Suspend the DASH pump. This makes sure there are no running or queued commands active when DASH loses connection 2) Put the phone into airplane mode to disable BT (as well as WiFi and Mobile data). This way it is guaranteed AAPS and DASH can not communicate. 3) Export settings (which includes the DASH state) 4) Copy the settings file just exported from the phone (as it is in airplane mode and we do not want to change that, easiest way is using USB cable) 5) Copy the settings file to the alternate phone. 6) Import settings on the alternate phones AAPS. 7) Check the DASH tab to verify it is seeing the Pod. 8) Un-suspend the Pod. 9) Check the DASH tab and confirm it is communicating with the Pod (use the refresh button)
Congratulations: you did it!
Wait! You still have the main phone thinking it can reconnect to the same DASH:
On the main phone choose “deactivate”. This is safe because the phone has no way of communicating with DASH to actually deactivated the Pod (it is still in airplane mode) 2) Deactivation will result in a communications error - this is expected. 3) Just hit “retry” a couple of times until AAPS offers the option to “Discard” the Pod.
When Discarded, verify AAPS is reporting “No Active Pod”. You can now safely disable airplane mode again.
How do I import settings from earlier versions of AAPS into AAPS v3 ?
You can only import settings (in AAPS v3) that were exported using AAPS v2.8x or v3.x. If you were using a version of AAPS older than v2.8x or you need to use setting exports older than v2.8x, then you need to install AAPS v2.8 first. Import the older settings of v2.x in v2.8. After checking that all is OK, you can export settings from v2.8. Install AAPS v3 and import v2.8 settings in v3.
If you use the same key to build v2.8 and v3, you won’t even have to import settings. You can install v3 over v2.8.
There were some new objectives added. You’ll need to validate them.