xDrip+ ayarları
If not already set up, then download xDrip+.
Disable battery optimization and allow background activity for the xDrip+ app.
You can safely download the latest APK (stable) unless you need recent features or are using sensors that are being actively integrated (like G7), in which case you should use the latest Nightly Snapshot.
Tüm CGM & FGM sistemleri için temel ayarlar
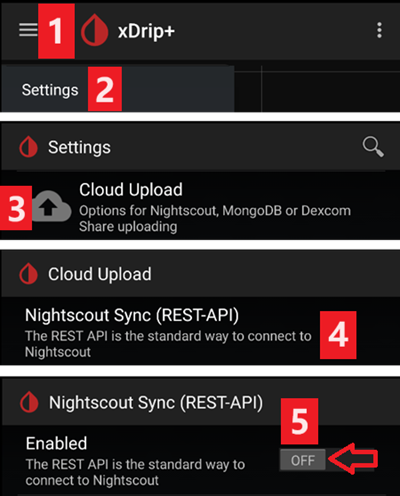
Disable Nightscout upload
Starting with AAPS 3.2, you shouldn’t let any other app upload data (blood glucose and treatments) to Nightscout.
→ Hamburger Menu (1) → Settings (2) → Cloud Upload (3) -> Nightscout Sync (REST-API)(4) → Switch OFF Enabled (5)
Disable automatic calibration and treatments
If you use an older version of AAPS (before 3.2), make sure to deactivate Automatic Calibration (7) If the checkbox for Automatic Calibration is checked, activate Download treatments (6) once, then remove the checkbox for Automatic Calibration and deactivate Download treatments again.
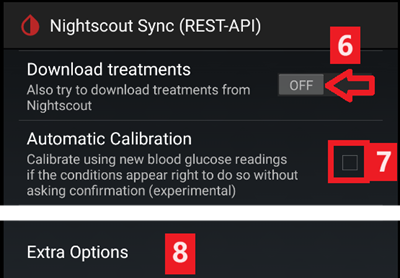
Tap Extra Options(8)
Deactivate Upload treatments(9) and make sure you will NOT use Back-fill data (11).
Option Alert on failures should also be deactivated (10). Otherwise you will get an alarm every 5 minutes in case Wi-Fi/mobile network issues or if the server is not available.

Inter-app Settings (Broadcast)
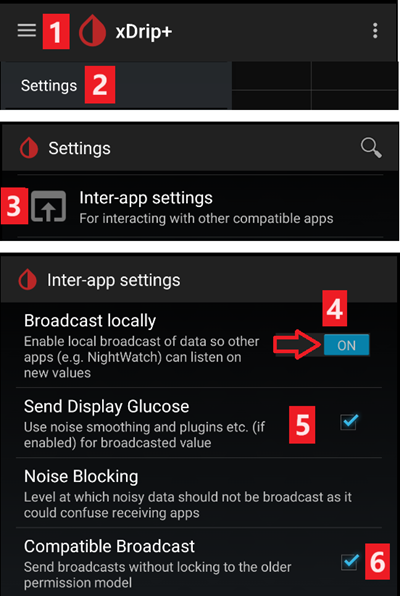
If you are going to use AAPS and the data should be forwarded to i.e. AAPS you have to activate broadcasting in xDrip+ in Inter-App settings.
→ Hamburger Menu (1) → Settings (2) → Inter-app settings (3) → Broadcast locally ON (4)
In order for the values to be identical in AAPS with respect to xDrip+, you should activate Send the displayed glucose value (5).
Enable Compatible Broadcast (6).
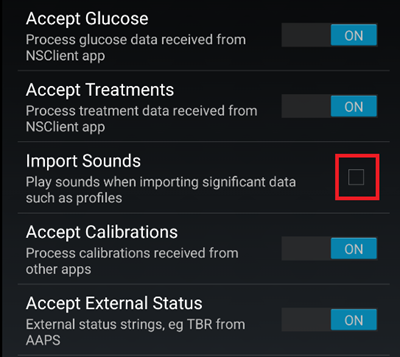
If you have also activated Accept treatments in xDrip+ and Enable broadcasts to xDrip+ in AAPS xDrip+ plugin, then xDrip+ will receive insulin, carbs and basal rate information from AAPS.
If you enable Accept Calibrations, xDrip+ will use the calibrations from AAPS. Be careful when you use this feature with Dexcom sensors: read this first.
Remember to disable Import Sounds to avoid xDrip+ making a ringtone every time AAPS sends a basal/profile change.
Alıcı tanımlama
If you discover problems with local broadcast (AAPS not receiving BG values from xDrip+) go to → Hamburger Menu (1) Settings (2) → Inter-app settings (3) → Identify receiver (7) and enter
info.nightscout.androidapsfor AAPS build (if you are using PumpControl build, please enterinfo.nightscout.aapspumpcontrolinstead!!).Lütfen Dikkat: Otomatik düzeltme bazen i’yi büyük harfe çevirme eğilimindedir.
info.nightscout.androidapsyazarken yalnızca küçük harf kullanmalısınız (veya PumpControl içininfo.nightscout.aapspumpcontrol). I büyük harf olursa, APPS xDrip+’dan KŞ değerlerini alamaz.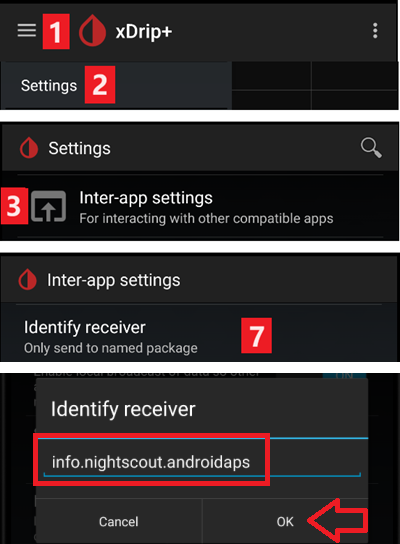
Use AAPS to calibrate in xDrip+
If you want to be able to use AAPS to calibrate then in xDrip+ go to Settings → Interapp Compatibility → Accept Calibrations and select ON.
You may also want to review the options in Settings → Less Common Settings → Advanced Calibration Settings.
Dexcom G6
Dexcom G6 vericisi, Dexcom alıcısına (veya alternatif olarak t:slim pompasına) ve telefonunuzdaki bir uygulamaya aynı anda bağlanabilir.
xDrip+’ı alıcı olarak kullanmadan önce Dexcom uygulamasını telefonunuzdan kaldırın. xDrip+ ve Dexcom uygulamasını vericiye aynı anda bağlayamazsınız!
If you need Clarity and want to profit from xDrip+ features, use the Build Your Own Dexcom App with local broadcast to xDrip+, or use xDrip+ as a Companion app receiving notifications from the official Dexcom app.
G6 verici seri numarasına bağlı xDrip+ sürümü
All G6 transmitters manufactured after fall/end 2018 are called “Firefly”. They do not allow sensor restart without removing the transmitter, they do not send raw data. It is recommended to use the latest Nightly Snapshot.
Old rebatteried transmitters and modified trasmitters allow sensor life extension and restarts, they also send raw data. You can use the latest APK (stable).
Dexcom’a özel ayarlar
Follow these instructions to setup xDrip+.
“Önleyici yeniden başlatma” önerilmez
Only rebatteried or modified Dexcom transmitters. Preemptive restarts do not work with standard transmitters and will stop the sensor completely: you need to remove the transmitter to restart the sensor.
Dexcom sensörlerinde otomatik olarak süre uzatma (önleyici yeniden başlatma), yeniden başlatmanın ardından 9. günde KŞ değerlerinde “atlamalara” yol açabileceğinden önerilmez.
Güvenli bir şekilde kullanmak için dikkat edilmesi gereken birkaç nokta vardır:
xDrip+ veya Spike’ta yerel verileri kalibrasyon koduyla kullanıyorsanız, yapılacak en güvenli şey, sensörün “önleyici yeniden başlatılmasına” izin vermemektir.
Önleyici yeniden başlatma kullanmanız gerekiyorsa, değişikliği gözlemleyebileceğiniz ve gerekirse kalibre edebileceğiniz günün bir saatinde yaptığınızdan emin olun.
Sensörleri yeniden başlatıyorsanız, en güvenli sonuçlar için 11. ve 12. günlerde fabrika kalibrasyonu olmadan yapın ya da kalibrasyona hazır olduğunuzdan ve sapmaları göz önünde bulundurduğunuzdan ve gerekirse kalibrasyon ile düzeltebildiğinizden emin olun.
Fabrika kalibrasyonu ile “Pre-soaking” ön ısınma denilen sensörü daha önce verici olmadan doku sıvısına “alışacak” şekilde yerleştirmek, muhtemelen glikoz değerlerinde sapmalara yol açar. ‘pre-soak’ ön ısınma yapıyorsanız, en iyi sonuçları almak için muhtemelen sensörü kalibre etmeniz gerekecektir.
Meydana gelebilecek değişiklikler konusunda dikkatli değilseniz, fabrikada kalibre edilmemiş moda dönmek ve sistemi bir G5 gibi kullanmak daha iyi olabilir.
Bu önerilerin ayrıntıları ve nedenleri hakkında daha fazla bilgi edinmek için Tim Street tarafından yayınlanan www.diabettech.com adresindeki makalenin tamamını okuyun.
G6 vericisine ilk kez bağlanma
İkinci ve sonraki vericiler için aşağıdaki Verici ömrünü uzatma konusuna bakın.
Follow these instructions.
Verici pil durumu
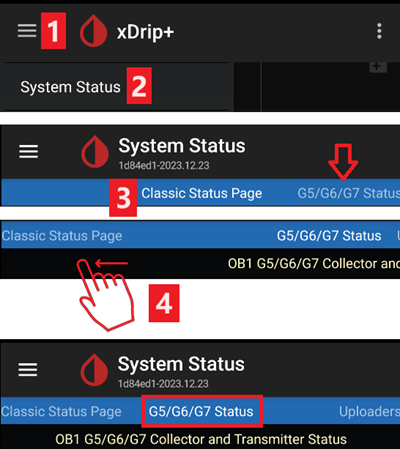
Battery status can be controlled in system status
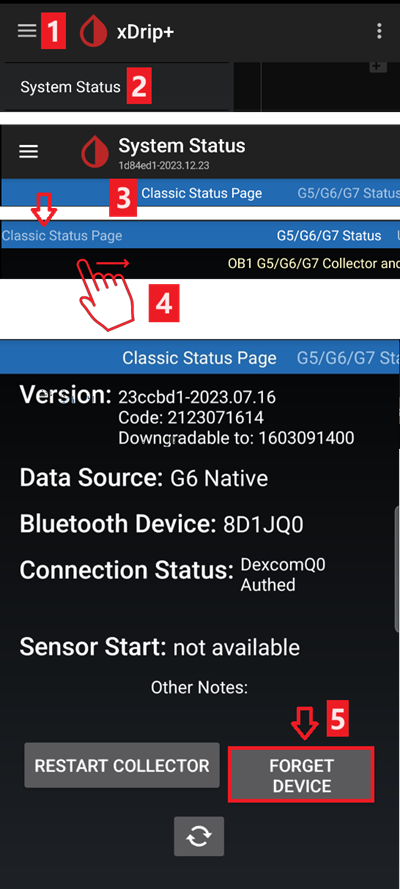
→ Hamburger Menu (1) → System Status (2) → If you are on the Classic Status Page (3) swipe the screen (4) to reach → G5/G6/G7 Status screen.
See here for more information.
Verici ömrünü uzatın
Lifetime cannot be extended for Firefly transmitters: only rebatteried or modified transmitters.
Follow these instructions for non-Firefly transmitters.
Vericiyi değiştirme
Orijinal Dexcom alıcısını kapatın (kullanılıyorsa).
Stop sensor (only if replacing sensor).
xDrip sistem durumunda VE akıllı telefonların BT ayarlarında cihazı unutun (Dexcom?? olarak görünen ?? yerinde are the last two digits of the transmitter serial no.)
→ Hamburger Menu (1) → System Status (2) → If you are on the Classic Status Page (3) swipe the screen (4) to reach → G5/G6/G7 Status screen → Forget Device (5).
Remove transmitter (and sensor if replacing sensor). To remove transmitter without removing sensor see this, or this video https://youtu.be/AAhBVsc6NZo.
Yeniden bağlanmayı önlemek için eski vericiyi uzağa koyun. A microwave is a perfect Faraday shield for this - but unplug power cord to be 100% sure no one is turning the microwave on.
Follow these instructions.
xDrip+ ilk okumaları göstermeden önce orijinal Dexcom alıcısını (kullanılıyorsa) açmayın.
Yeni sensör başlatma
Orijinal Dexcom alıcısını kapatın (kullanılıyorsa).
Stop sensor following these instructions.
Insert and then start a new sensor following these instructions.
Sensör kodunu öğrenme
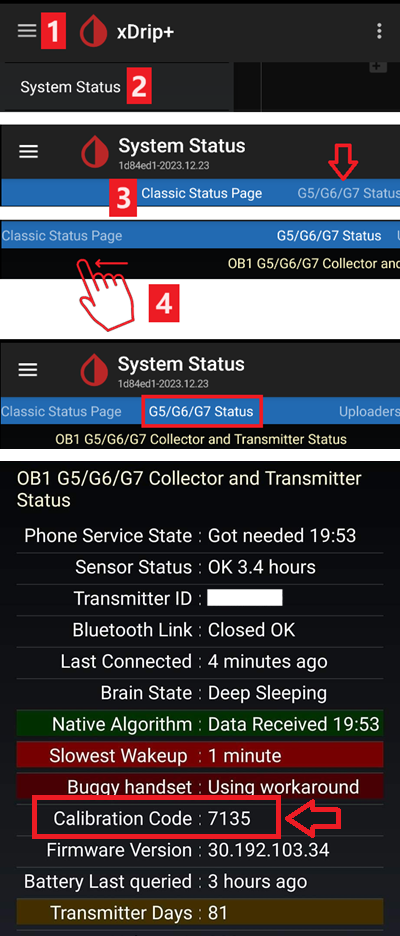
→ Hamburger Menu (1) → System Status (2) → If you are on the Classic Status Page (3) swipe the screen (4) to reach → G5/G6/G7 Status screen → Calibration Code.
Dexcom G5/G6 ve xDrip+ ile İlgili Sorunları Giderme
Vericiyi bağlamada sorun
Follow these instructions.
Yeni sensör başlatılırken oluaşabilecek sorunlar
Follow these instructions.
Libre 1
Setup your NFC to Bluetooth bridge in xDrip+
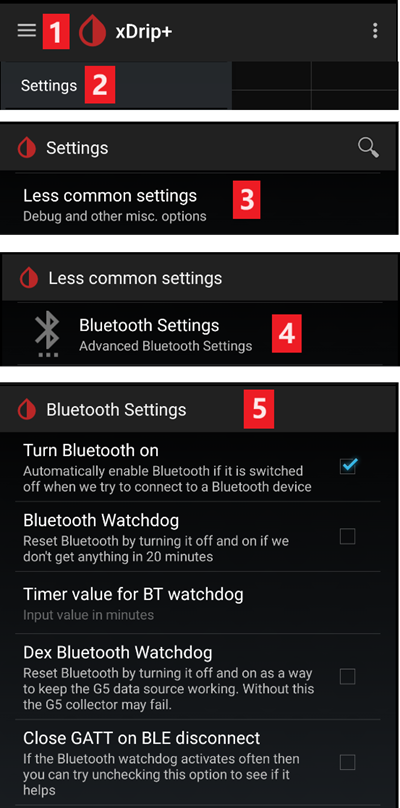
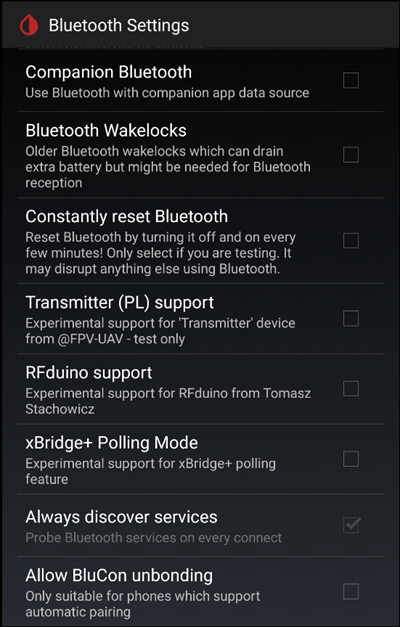
→ Hamburger Menu (1) → Settings (2) → Less common settings (3) → Bluetooth Settings (4)
In Bluetooth Settings set the checkboxes exactly as in the screenshots below (5)
Disable watchdogs as they will reset the phone Bluetooth and interrupt your pump connection.
You can try to enable the following settings (7)
Taramayı kullan
Trust Auto-Connect
Use Background Scans
If you easily lose connection to the bridge or have difficulties recovering connection, DISABLE THEM (8).
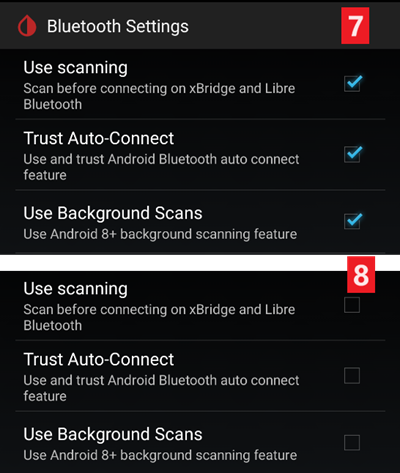
Leave all other options disabled unless you know why you want to enable them.
Libre akıllı okuyucu pil seviyesi
Battery level of bridges such as MiaoMiao and Bubble can be displayed in AAPS (not Blucon).
Ayrıntıları ekran görüntüleri sayfasında bulabilirsiniz.
Libre Vericiyi Bağla & sensörü başlat
If your sensor requires it (Libre 2 EU and Libre 1 US) install the latest out of process algorithm.
Your sensor must be already started using the vendor app or the reader (xDrip+ cannot start or stop Libre sensors).
Set the data source to Libre Bluetooth.
→ Hamburger Menu (1) → Settings (2) → Select Libre Bluetooth in Hardware Data source (3)

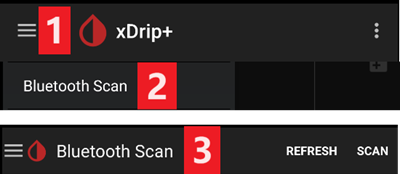
Scan Bluetooth and connect the bridge.
→ Hamburger Menu (1) → Scan Bluetooth (2) → Scan (3)
If xDrip+ can’t find the bridge, make sure it’s not connected to the vendor app. Put it in charge and reset it.
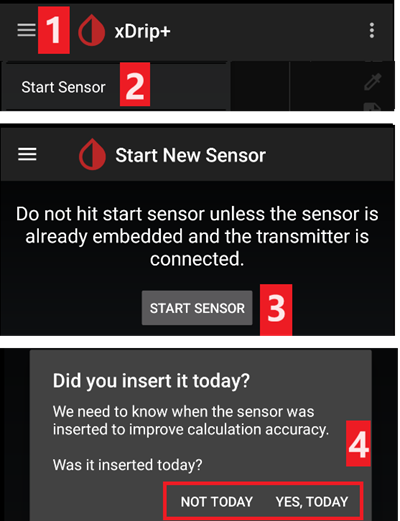
Start the sensor in xDrip+.
→ Hamburger Menu (1) → Start sensor (2) → Start sensor (3) → Set the exact time you started it with the reader or the vendor app. If you didn’t start it today, answer “Not Today” (4).
Libre 2 patched app
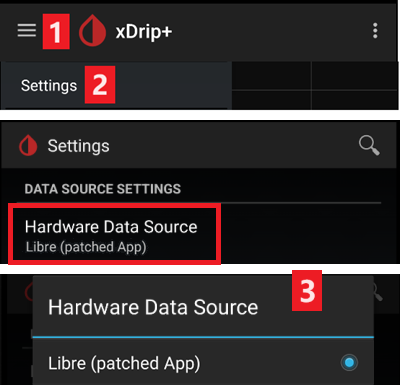
Set the data source to Libre patched app.
→ Hamburger Menu (1) → Settings (2) → Select Libre (patched App) in Hardware Data source (3)
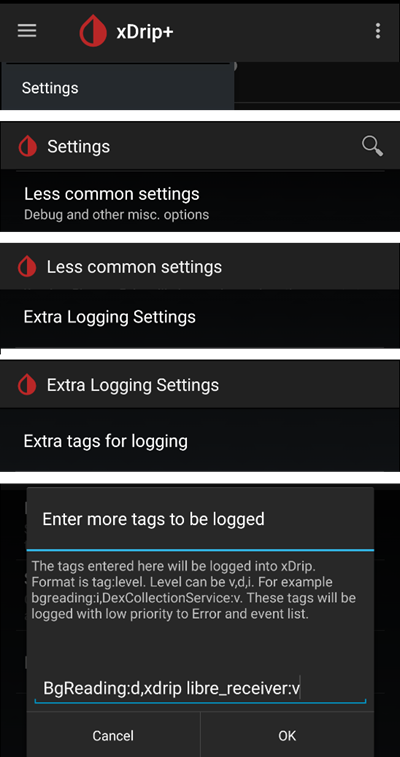
You can add
BgReading:d,xdrip libre_receiver:vunder Less Common Settings->Extra Logging Settings->Extra tags for logging. Bu, sorun giderme için ek hata mesajlarını günlüğe kaydeder.