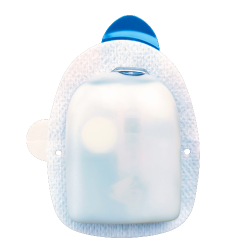
Omnipod DASH
הוראות אלה מיועדות להגדרת משאבת Omnipod DASH ** החדשה (לא Omnipod Eros)**. מנהל ההתקן של Omnipod זמין כחלק מ-AndroidAPS החל מגרסה 3.0.
תוכנה זו היא חלק מפתרון לבלב מלאכותי DIY ואינו מוצר אך דורש ממכם לקרוא, ללמוד ולהבין את המערכת, כולל את אופן השימוש בה. האחריות על השימוש במערכת היא עליכם בלבד.
מפרט Omnipod DASH
זהו המפרט של Omnipod DASH ומה מבדיל אותה מ-Omnipod EROS:
פודי DASH ניתנים לזיהוי באמצעות מכסה מחט כחול (ל-EROS יש מכסה מחט שקוף). מעבר לכך הפודים זהים בחינת הממדים הפיזיים
אין צורך במכשיר גישור בין Omnipod לבלוטות« (אין צורך ב-RileyLink, OrangeLink או EmaLink).
חיבור הבלוטות« נוצר רק בעת הצורך, הלופ מתחבר לפוד כדי לשלוח פקודה ומתנתק מיד לאחר מכן!
לא עוד שגיאות ”אין חיבור לריילינק \ פוד“
AAPS ימתין לנגישות לפוד כדי לשלוח פקודות
בהפעלת פוד, AAPS יחפש ויחבר פוד DASH חדש.
טווח צפוי: 5-10 מטרים (בערך)
דרישות חומרה ותוכנה
Omnipod DASH Pod חדש (מזוהה באמצעות מכסה מחט כחול)
טלפון Android תואם עם חיבור בלוטות« (BLE)
לא כל דגמי הטלפון וגרסאות האנדרואיד מובטחות לעבוד כהלכה. יש לבדוק את הטלפונים שנבדקו עם DASH או פשוט נסו עם הטלפון שלכם וספרו לנו את התוצאה (הפניה לטלפון ואזור גיאוגרפי, גרסת אנדרואיד, עבד / עם קשיים / לא עבד).
הערה חשובה: היו מספר מקרים של איבודי חיבור קבועים שאינם ניתנים לשחזור בעת שימוש בפודים ישנים יותר עם גירסת קושחה 3X.XX היזהרו בעת שימוש בפודים הישנים האלה עם AndroidAPS, במיוחד עם התקני בלוטות« מחוברים אחרים! שימו לב שמנהל ההתקן של AAPS עם Omnipod Dash מתחבר לפוד באמצעות בלוטות« בכל פעם שהוא שולח פקודה ואז מתנתק מיד לאחר מכן. חיבורי הבלוטות« עלולים להיות מופרעים על ידי מכשירים אחרים המקושרים לטלפון המפעיל את AAPS כגון אוזניות וכו«… (מה שעלול לגרום, במקרים נדירים, לבעיית חיבור או לשגיאות\אובדן פוד בהפעלה או לאחר מכן בחלק מדגמי הטלפון).
AAPS גרסה 3.0 ומעלה נבנתה ומותקנת תוך שימוש בהוראות Build APK.
הוראות אלה מניחות כי אתם מתחילים שימוש בפוד חדש; אם זה לא כך, אנא התאזרו בסבלנות ונסו להתחיל בתהליך זה לקראת החלפת הפוד הבא.
לפני שמתחילים
בטיחות קודמת לכול - אל תנסו לבצע את תהליך זה בסביבה שבה לא תוכלו להתאושש משגיאה (פודים נוספים, אינסולין ומכשיר הטלפון הם חובה).
ה-Omnipod Dash PDM (השלט המקורי) לא יעבוד עוד לאחר שמנהל ההתקן של AAPS ל-Dash יפעיל את הפוד. בעבר השתמשתם ב-Dash PDM כדי לשלוח פקודות לפוד. פוד מסוגל לקבל פקודות רק ממכשיר אחד. המכשיר שמפעיל את הפוד הוא המכשיר היחיד שמורשה לתקשר איתו מאותה נקודה ואילך. משמעות הדבר היא שברגע שיופעל פוד עם טלפון האנדרואיד דרך מנהל התקן ה-Dash, לא ניתן יהיה להשתמש ב-PDM עם הפוד הזה. מנהל ההתקן של AAPS ל-Dash בטלפון האנדרואיד הוא עכשיו ה-PDM בפועל.
זה לא אומר שצריך לזרוק את ה-PDM, מומלץ לשמור אותו בסביבה כגיבוי למקרי חירום, למשל כאשר הטלפון הולך לאיבוד או AAPS אינו פועל כהלכה.
הפוד לא יפסיק לספק אינסולין אם הוא מאבד חיבור ל-AndroidAPS. מינוני הבזאלי המוגדרים כברירת מחדל מתוכנתים על הפוד בזמן הפעלתו כפי שהוגדר בפרופיל הפעיל הנוכחי. כל עוד AndroidAPS פעיל הוא ישלח פקודות של מינונים בזאליים זמניים שיפעלו לכל היותר 120 דקות. כאשר מסיבה כלשהי הפוד אינו מקבל פקודות חדשות (למשל בגלל שהתקשורת אבדה עקב מרחק גדול מהטלפון) הפוד יחזור אוטומטית למינוני הבזאלי המוגדרים כברירת מחדל.
פרופילי בזאלי המתחילים בשעות לא עגולות אינם נתמכים ב-AndroidAPS. פרופיל ברירת המחדל ב-AndroidAPS אינו תומך במסגרת זמן של מינון בזאלי של 30 דקות אם אתם חדשים ב-AndroidAPS ואתם מגדירים את הפרופיל הבזאלי הבסיסי שלך בפעם הראשונה, חשוב לשים לב שמינונים שמתחילים בשעה לא עגולה אינם נתמכים, ותצטרכו להתאים את פרופיל הבזאלי שלך כך שמינון יתחיל בשעה עגולה. לדוגמה, אם יש מינון בזאלי של למשל 1.1 יחידות שמתחיל בשעה 09:30 ויש לו משך של שעתיים ומסתיים בשעה 11:30, זה לא יעבוד. יהיה עליכם לעדכן את המינון של 1.1 יחידות לטווח זמן של 09:00-11:00 או 10:00-12:00. למרות שהחומרה של Omnipod Dash עצמה תומכת במרווחי פרופיל המינון הבזאלי של 30 דקות, AndroidAPS לא מסוגל לקחת אותם בחשבון עם האלגוריתמים שלה כרגע.
0U/h profile basal rates are NOT supported in AAPS While the DASH pods do support a zero basal rate, since AAPS uses multiples of the profile basal rate to determine automated treatment it cannot function with a zero basal rate. A temporary zero basal rate can be achieved through the ”Disconnect pump“ function or through a combination of Disable Loop/Temp Basal Rate or Suspend Loop/Temp Basal Rate.
הפעלת מנהל התקן ה-Dash ב-AAPS
אפשר לאפשר את מנהל ההתקן של Dash בשני אופנים:
אפשרות 1: התקנות חדשות
כשמתקינים AndroidAPS לראשונה, אשף ההתקנה ילווה אתכם לאורך ההתקנה וההגדרה. בחרו ”DASH“ כשתגיעו לחלק של בחירת המשאבה.
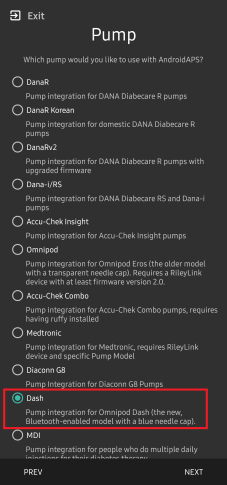
אם אתם לא בטוחים במעשיכם, בחרו ”משאבה וירטואלית“ ותוכלו לבחור ב-”DASH“ מאוחר יותר, לאחר שהגדרתם את AndroidAPS (ראו אפשרות 2).
אפשרות 2: בונה התצורה
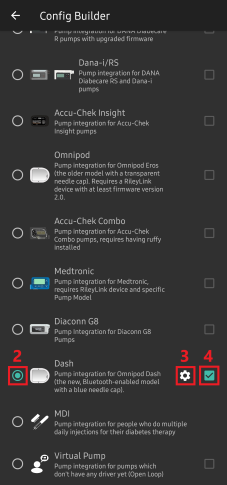
בהתקנה קיימת, תוכלו לבחור במשאבת DASH בבונה התצורה:
בפינה הימנית-עליונה בתפריט ההמבורגר (☰) בחרו בונה התצורה (1) ← משאבה ← Dash ← בחירת הכפתור העגול (”כפתור רדיו“) (2) ← גלגל שיניים (3).
בסימון V (4) בתיבה ליד גלגל השיניים (3) אתם תאפשרו לתפריט Dash להופיע כלשונית בממשק AAPS תחת השם DASH. סימון ה-V יקל על הגישה אל הפקודות של DASH בעת השימוש ב-AAPS.
הערה: שיטה מהירה יותר להגדרות Dash רשומה מטה בחלק על הגדרות Dash בדף זה.

אימות בחירת מנהל התקן Omnipod
כדי לוודא שהפעלת את מנהל ההתקן של Dash ב-AAPS, אם סימנתם את התיבה (4), החליקו ימינה מהלשונית סקירה כללית, שם תראו כעת לשונית DASH. אם לא סימנתם את התיבה, תמצאו את הלשונית DASH בתפריט ההמבורגר מימין למעלה.

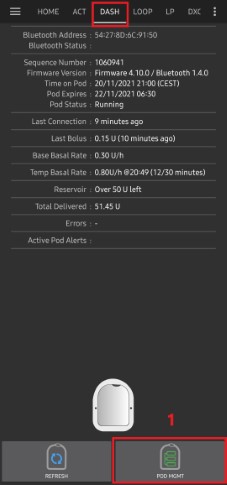
תצורת Dash
אנא החליקו שמאלה ללשונית DASH בה תוכלו לנהל את כל פונקציות הפוד (חלק מהפונקציות הללו אינן מופעלות או גלויות ללא פוד פעיל):
![]() רעננו את הקישור והסטטוס של הפוד, תוכלו להשתיק אזעקות פוד כאשר הוא מצפצף
רעננו את הקישור והסטטוס של הפוד, תוכלו להשתיק אזעקות פוד כאשר הוא מצפצף
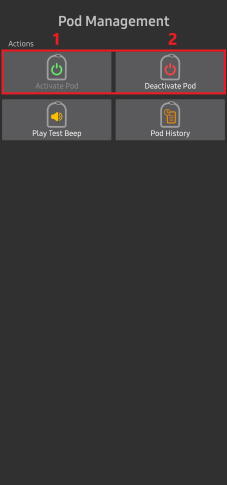
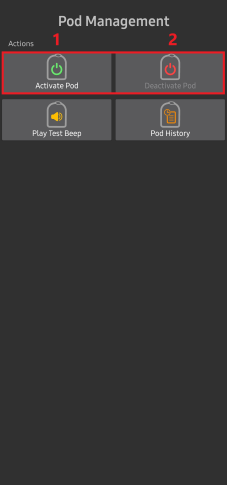
![]() ניהול פוד (הפעלה, השבתה, השמעת צפצוף בדיקה והיסטוריית פוד)
ניהול פוד (הפעלה, השבתה, השמעת צפצוף בדיקה והיסטוריית פוד)
Activate Pod
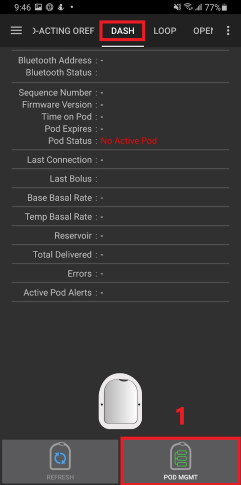
נווטו אל הלשונית DASH ולחצו על הלחצן ניהול פוד (1), ולאחר מכן לחצו על הפעל פוד (2).

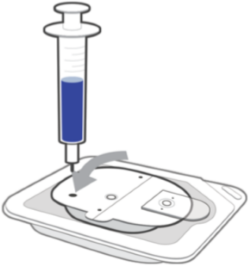
מסך מילוי פוד מוצג. מלאו פוד חדש עם לפחות 80 יחידות אינסולין והקשיבו לשני צפצופים המעידים על כך שהפוד מוכן להדבקה. בעת חישוב הכמות הכוללת של האינסולין הדרוש למשך 3 ימים, קחו בחשבון כי הפעלת הפוד תשתמש ב-3 עד 10 יחידות.
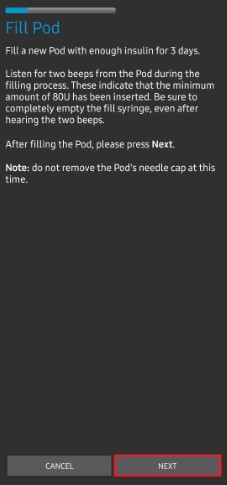
ודאו שהפוד החדש והטלפון שבו פועל AAPS נמצאים בסמיכות זה לזה ולחצו על הבא.
הערה: למקרה שתקבלו את הודעת השגיאה שלהלן (זה יכול לקרות), נא לא להיבהל. לחצו על נסה שוב. ברוב המצבים ההפעלה תימשך בהצלחה.
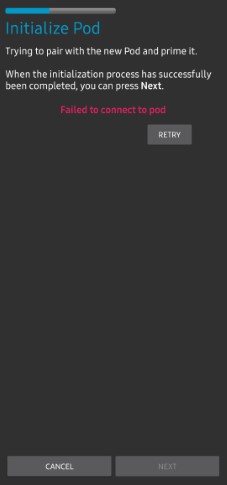
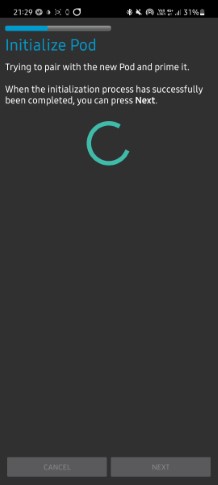
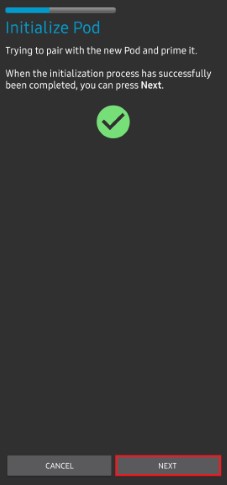
במסך אתחול פוד, הפוד יתחיל להתכונן להדבקה (אתם תשמעו קליק ואחריו סדרה של צלילי תקתוק). סימן ירוק יוצג לאחר תיחול מוצלח, והלחצן הבא יהפוך לזמין. לחצו על הבא כדי להשלים את תיחול התרמיל ולהציג את מסך הצמד פוד.
לאחר מכן, הכינו את אתר ההדבקה של הפוד החדש. הסירו את מכסה המחט של הפוד. אם אתם רואים משהו שבולט מהפוד, בטלו את התהליך והתחילו מההתחלה עם פוד חדש. אם הכל נראה תקין, הסירו את כיסוי הנייר הלבן מהדבק והניחו את הפוד על המקום הנבחר על גופכם. לסיום, לחצו על הבא.
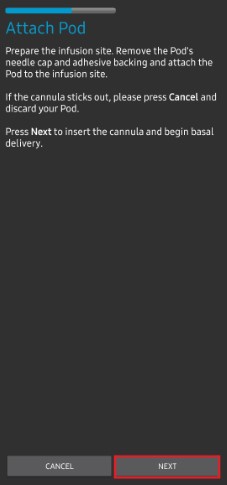
תיבת הדו-שיח הצמד פוד תופיע כעת. לחצו על אישור רק אם אתם מוכנים להחדרת הצינורית.

לאחר לחיצה על אישור, ייתכן שיחלוף זמן מה עד שהאומניפוד יגיב ויחדיר את הקנולה (עד 1-2 דקות), אנא שמרו על סבלנות.
הערה: לפני החדרת הקנולה, מומלץ לצבוט את העור בסביבת נקודת ההחדרה. זה מבטיח החדרה חלקה של המחט ומפחית את הסיכויים לפתח חסימות.

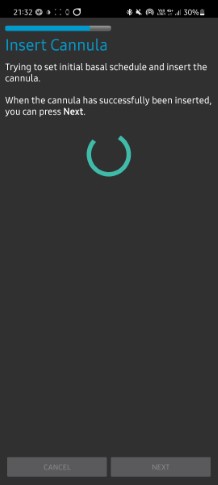
יופיע V ירוק, ולחצן הבא יופעל לאחר החדרת מוצלחת של הקנולה. לחצו על הבא.
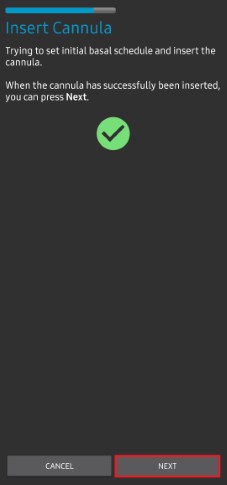
מסך הפוד הופעל מוצג. לחצו על סיום. מזל טוב! הפעלתם את הפוד.

במסך התפריט ניהול פוד הכפתור הפעל פוד (1) אמור להיות מושבת והכפתור כבה פוד (2) אמור להיות מאופשר. הסיבה לכך היא שהפוד פעיל כעת ולא ניתן להפעיל פוד נוסף מבלי להשבית את הפוד הנוכחי.
לחצו על כפתור החזרה בטלפון כדי לחזור ללשונית DASH שתציג כעת מידע על הפוד הנוכחי, כולל המינון הבזאלי הנוכחי, רמת מכל האינסולין, אינסולין שהוזרק, שגיאות של הפוד והתראות.
לפרטים נוספים על המידע המוצג, עברו לקטע לשונית DASH במסמך זה.
מומלץ לייצא הגדרות לאחר הפעלת הפוד. עשו זאת בכל החלפת פוד ופעם בחודש, העתיקו את הקובץ המיוצא לגיבוי בענן שלכם. ראו הוראות ייצוא הגדרות.
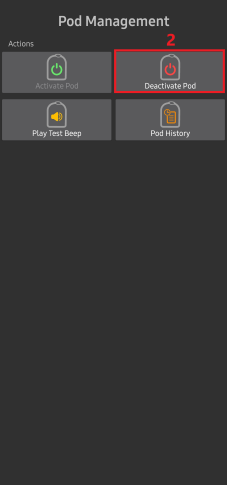
Deactivate Pod
בנסיבות רגילות, פוד אמור לפעול שלושה ימים (72 שעות) ועוד 8 שעות לאחר אזהרת תפוגתו, סך הכל 80 שעות שימוש בפוד.
כיצד להשבית את הפוד (מתוקף התפוגה או בעקבות כשל של הפוד):
נווטו ללשונית DASH ולחצו על ניהול הפוד (1) ולאחר מכן בחרו ניהול פוד ואז כבה פוד.
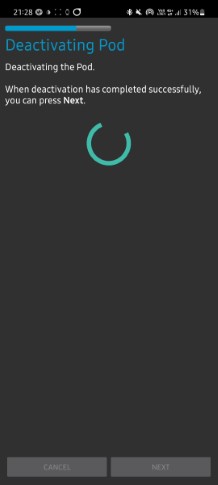
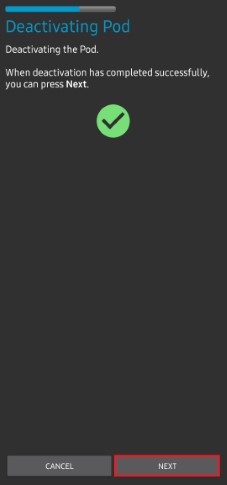
במסך כבה פוד, לחצו על הבא כדי להתחיל בתהליך של השבתת הפוד. אתם תשמעו צפצוף אישור מהפוד שהכיבוי הצליח.
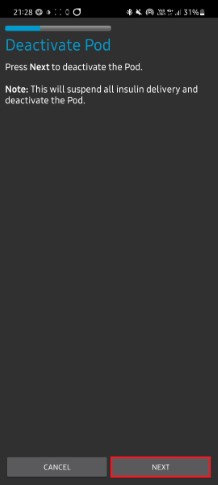
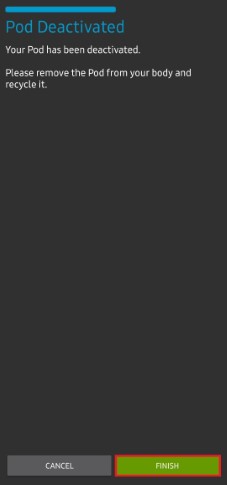
סימון ירוק יופיע לאחר השבתה מוצלחת. לחצו על הבא כדי לעבור אל המסך ”הפוד הושבת“. כעת תוכלו להסיר את הפוד כיוון שפעילותו הושבתה.
לחצו על הכפתור הירוק כדי לחזור למסך ניהול הפוד.
בתפריט ניהול פוד; לחצו כפתור »הקודם« של הטלפון כדי לחזור ללשונית DASH. ודאו שהשדה סטטוס הפוד: מציג הודעת אין פוד פעיל.
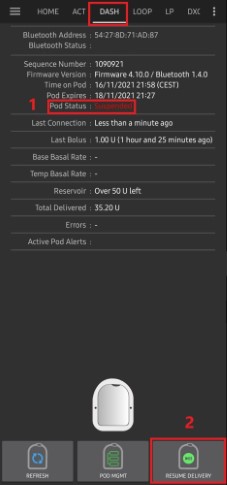
חידוש הזרקת האינסולין
הערה: במהלך החלפת פרופיל, Dash חייב להשעות את ההזרקה לפני הגדרת הפרופיל הבזאלי החדש. אם התקשורת נכשלת בין שתי הפקודות, אז ניתן להשהות את ההזרקה. קראו את ההזרקה מופסקת בחלק על פתרון בעיות לפרטים נוספים.
השתמשו בפקודה זו כדי להנחות את הפוד הפעיל כעת לחדש את אספקת האינסולין. לאחר עיבוד הפקודה, מתן האינסולין יחודש לפי המינון הבזאלי הנוכחי בהתאם להגדרתו בפרופיל. הפוד יקבל שוב פקודות עבור בולוס, מינון בזאלי זמני ו-SMB.
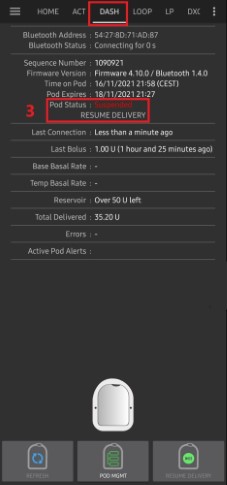
נווטו אל הלשונית DASH וודאו שהשדה סטטוס הפוד (1) מציג את מופסק, לאחר מכן הקישו על חידוש הזרקה (2) כדי להתחיל בתהליך הוראה לפוד הנוכחי לחדש את הזרקת האינסולין. ההודעה חידוש הזרקה תוצג בשדה סטטוס הפוד (3).
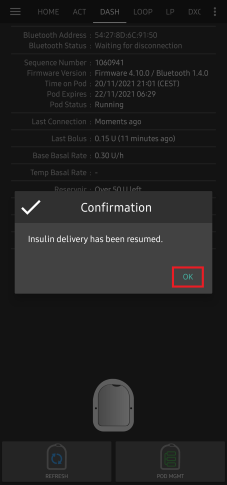
כאשר הפקודה »חידוש הזרקה« מצליחה, תיבת דו-שיח לאישור תציג את ההודעה מתן האינסולין חודש. לחצו על אישור כדי להמשיך.
הלשונית DASH תעדכן את השדה סטטוס הפוד (1) ויוצג פועל, והלחצן חידוש הזרקה לא יוצג יותר

השתקת התראות פוד
הערה - הלחצן »השתקה« זמין רק בלשונית DASH כאשר הופעלה התראה על תפוגת הפוד או התראת מכל נמוך. אם לחצן השתקת ההתראות לא גלוי ואתם שומעים צפצוף מהפוד, נסו ללחוץ על »רענן סטטוס הפוד«.
התהליך שלהלן יראה כיצד לאשר ולבטל צפצופים של הפוד המתרחשים כאשר זמן פעולת הפוד מתקרב למגבלת הזמן של הפוד של 72 שעות (3 ימים). מגבלת זמן אזהרה זו מוגדרת בשעות לפני כיבוי שבהגדרת התראות ה-Dash. אורך החיים המרבי של פוד הוא 80 שעות (3 ימים ו-8 שעות), אולם היצרן ממליץ שלא לחרוג מ-72 השעות (3 ימים).
כאשר הפוד יגיע לזמן האזהרה שעות לפני כיבוי, הוא יצפצף צפצוף אזהרה כדי להודיע שהוא מתקרב לזמן התפוגה שלו ובקרוב תידרש החלפת פוד. אפשר לאמת זאת בלשונית DASH, השדה תפוגת הפוד: (1) יציג את השעה המדויקת בה הפוד יפוג (72 שעות לאחר ההפעלה) והטקסט יצבע באדום לאחר שהזמן הזה יעבור. בשדה התראות פוד פעילות (2) מוצגת הודעת המצב תוקף הפוד יפוג בקרוב. כעת יופעל הלחצן השתקת התראות (3).
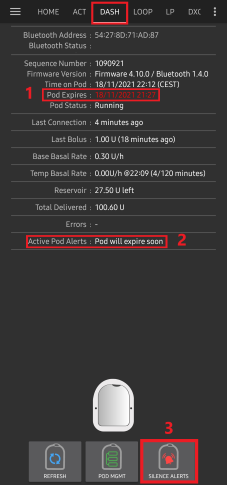
נווטו לכרטיסייה DASH ולחצו על השתקת התראות (2). AAPS ישלח את הפקודה לפוד כדי לבטל את צפצופי אזהרת התפוגה והשדה סטטוס הפוד (1) יעודכן לאישור התראות.
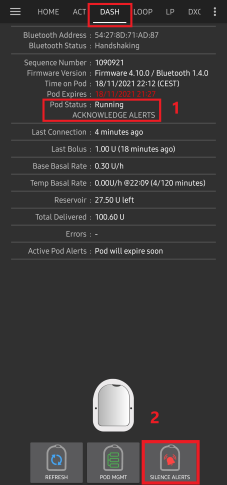
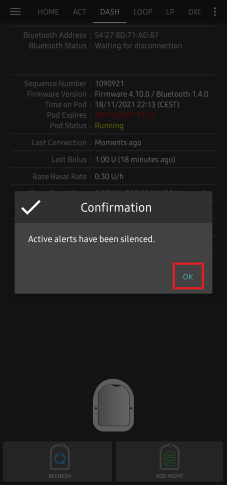
לאחר השבתה מוצלחת של ההתראות, שני צפצופים יישמעו על ידי הפוד הפעיל ותיבת דו-שיח תציג את ההודעה הפעלת ההתראות הושתקה. לחצו על אישור כדי לאשר ולבטל את תיבת הדו-שיח.
נווטו ללשונית DASH. תחת התראות פוד פעילות, הודעת האזהרה אינה מוצגת עוד והפוד כבר לא יוציא צפצופי אזהרת תפוגה.
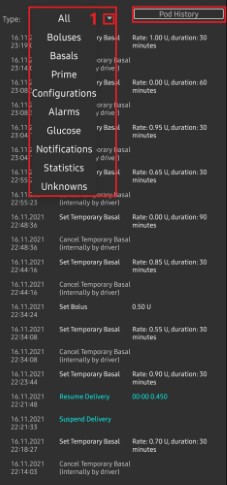
הצגת היסטוריית הפוד
פרק זה מתאר כיצד לבדוק את היסטוריית הפודים ולסנן לפי קטגוריות פעולה שונות. כלי היסטוריית הפוד מאפשר לצפות בפעולות והתוצאותיהן שנעשו בעת השימוש בפוד במהלך השימוש בו (72 - 80 שעות).
תכונה זו מועילה לאימות בולוסים, בזאלים זמניים ופקודות בזאליות שנשלחו לפוד. הקטגוריות הנותרות שימושיות באופן כללי לפתרון בעיות וקביעת סדר האירועים שהתרחשו עד לכשל.
הערה: רק הפקודה האחרונה יכולה להיות לא ודאית. פקודות חדשות לא יישלחו עד שהפקודה ”הלא ודאית“ האחרונה תהפוך ל’אושרה« או »נדחתה«. הדרך »לתקן« פקודות לא ודאיות היא »רענון סטטוס הפוד«.
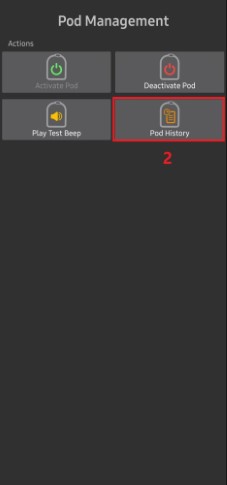
נווטו ללשונית DASH ולחצו על ניהול הפוד (1) ולאחר מכן בחרו היסטוריית פוד (2) כדי לפתוח את מסך היסטוריית הפוד.

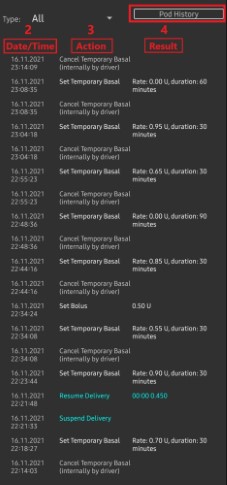
במסך היסטוריית הפוד, קטגוריית ברירת המחדל של הכל (1) מוצגת ומציגה את התאריך והשעה (2) של כל פעולות (3) הפוד ותוצאות (4) בסדר כרונולוגי הפוך. השתמשו בלחצן »הקודם« של הטלפון פעמיים כדי לחזור ללשונית DASH בממשק הראשי של AAPS.
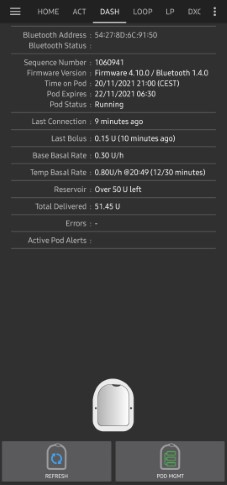
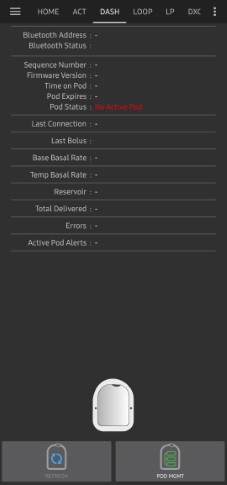
לשונית DASH
להלן הסבר על מבנה ומשמעות הסמלים ושדות הסטטוס בלשונית DASH בממשק הראשי של AAPS.
הערה: אם הודעה כלשהי בשדות הסטטוס מדווחת ”(לא בטוח)“, יהיה עליכם ללחוץ על כפתור הרענון כדי לרענן את מצב הפוד.
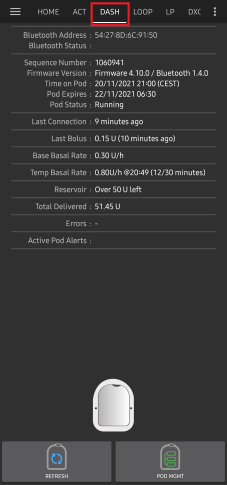
שדות
כתובת בלוטות«: מציג את כתובת הבלוטות« הנוכחית של הפוד המחובר.
סטטוס בלוטות«: מציג את מצב החיבור הנוכחי.
מספר רצף: מציג את מספר הרצף של הפוד הפעיל.
גרסת קושחה: מציג את גרסת הקושחה החיבור הפעיל.
השעה בפוד: מציג את השעה הנוכחית בפוד.
תפוגת הפוד: מציג את התאריך והשעה שבהם יפוג הפוד.
סטטוס הפוד: מציג את מצב הפוד.
חיבור אחרון: מציג את מועד התקשורת האחרון עם הפוד.
לפני כמה רגעים - לפני פחות מ-20 שניות.
לפני פחות מדקה - יותר מעשרים שניות אך פחות מ-60 שניות.
לפני דקה אחת - יותר מ-60 שניות אך פחות מ-120 שניות (2 דקות)
לפני XX דקות - לפני יותר משתי דקות ככתוב בערך XX
בולוס אחרון: מציג את המינון של הבולוס האחרון שהפוד הזריק ולפני כמה זמן, בסוגריים.
בזאלי בסיסי: מציג את המינון הבזאלי המתוכנת עבור השעה הנוכחית בפרופיל הבזאלי.
מינון בזאלי זמני: מציג את המינון הבזאלי הזמני הפועל כעת בפורמט הבא:
יחידות\שעה @ מועד תחילת בזאלי זמני (משך הבזאלי הזמני)
לדוגמה: 0.00 יח«\שעה @ 18:25 (90/120 דקות)
מכל: מציג מעל 50+U כאשר נותרו יותר מ -50 יחידות במכל. כשיש פחות מ-50 יחידות, יתרתן מוצגת במדוייק.
סה“כ שהוזרק: מציג את המספר הכולל של יחידות האינסולין שהוזרקו. זה כולל אינסולין המשמש להפעלה ולתיחול.
שגיאות: מציג את השגיאה האחרונה. עיינו בהיסטוריית הפוד ובקובצי היומן אחר שגיאות קודמות ומידע מפורט יותר.
התראות פוד פעילות: שדה השמור להתראות הפועלות כרגע על הפוד הפעיל.
מקשים
![]() : שולח פקודת רענון לפוד לעדכון התקשורת.
: שולח פקודת רענון לפוד לעדכון התקשורת.
השתמשו כדי לרענן את מצב הפוד ולבטל סטטוסים המכילים את הטקסט ”(לא ודאי)“.
לקריאה נוספת ראו את הפרק פתרון בעיות מטה.
![]() : מנווט אל תפריט ניהול הפוד.
: מנווט אל תפריט ניהול הפוד.
![]() : לחיצה תשבית את הצפצופים והתראות של הפוד (תפוגה, מכל מרוקן…).
: לחיצה תשבית את הצפצופים והתראות של הפוד (תפוגה, מכל מרוקן…).
הלחצן מוצג רק לאחר אזהרת התפוגה של הפוד.
לאחר קבלת ההתראה, אייקון זה יפסיק להופיע.
![]() : מחדש את הזרקת האינסולין שהושהתה בפוד הנוכחי.
: מחדש את הזרקת האינסולין שהושהתה בפוד הנוכחי.
תפריט ניהול הפוד
להלן המשמעות של הכפתורים בתפריט ניהול פוד שאליהם ניתן לגשת על ידי לחיצה על ניהול פוד (0) בלשונית DASH. 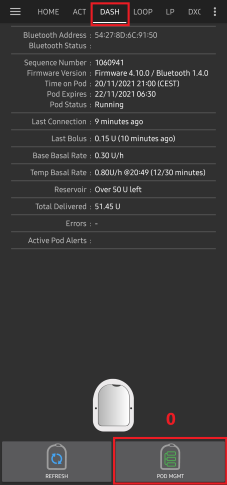
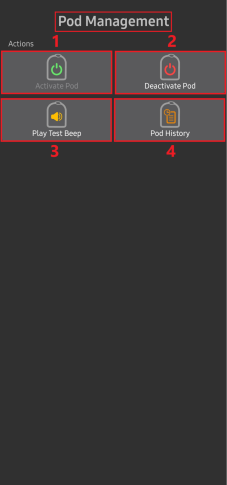
1 - הפעל פוד : מבצע תיחול והפעלה של פוד חדש.
2 - כבה פוד : מכבה את הפוד הנוכחי.
3 - השמע צפצוף ניסיון : בלחיצה כאן מושמע צפצוף ניסיון בודד בפוד.
4 - היסטוריית הפוד : מציג את היסטוריית פעילות הפוד הנוכחי.
הגדרות Dash
בפינה הימנית-עליונה בתפריט ההמבורגר (☰) בחרו בונה התצורה (1) ← משאבה ← Dash ← בחירת הכפתור העגול (”כפתור רדיו“) (2) ← גלגל שיניים (3). בסימון V (4) בתיבה ליד גלגל השיניים (3) אתם תאפשרו לתפריט Dash להופיע כלשונית בממשק AAPS תחת השם DASH.

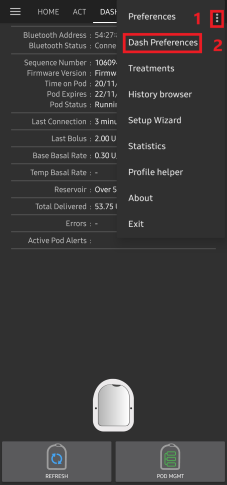
הערה: דרך מהירה יותר לגשת להגדרות Dash היא על ידי פתיחתתפריט 3 הנקודות (⋮) (1) בפינה הימנית העליונה של הלשונית DASH ובחירה בהעדפות Dash (2) מהתפריט שנפתח.
להלן קבוצות ההגדרות; תוכלו להפעילן או להשביתן באמצעות מתגים שיש לרוב ההגדרות המתוארות להלן:
הערה: כוכבית () מציינת את ברירת המחדל של הגדרה מופעלת.*
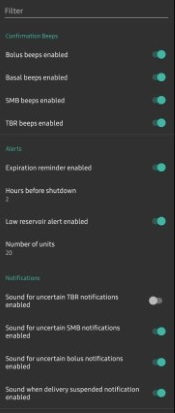
צפצופי אישור
מספק צפצופי אישור מהפוד על ביצוע בולוס, שינויים במינון הבזאלי, בזאלי זמני, SMB ושינויים אחרים.
צפצופי בולוס מופעלים: הפעלה או השבתת צפצופי אישור כאשר מוזרק בולוס.
צפצופי בזאלי מופעלים: הפעלת או השבתת צפצופי אישור כאשר נקבע מינון בזאלי חדש, המינון הבזאלי הפעיל מבוטל או המינון הבזאלי הנוכחי משתנה.
צפצופי SMB מופעלים: הפעלת או השבתת צפצופי אישור כאשר מוזרק SMB.
צפצופי בזאלי זמני מופעלים: הפעלת או השבתת צפצופי אישור כאשר בזאלי זמני מופעל או מבוטל.
התראות
מספק התראות של AAPS על תוקף הפוד, כיבויים, מכל נמוך על פי ספים מוגדרים.
שימו לב כי הודעת AAPS תינתן תמיד לכל התראה לאחר התקשורת הראשונית עם הפוד מאז הופעלה ההתראה. דחיית ההודעה לא תבטל את ההתראה, אלא אם כן מופעל אישור התראות פוד אוטומטי. כדי לבטל את ההתראה באופן ידני, יש לבקר בלשונית DASH וללחוץ על השתקת התראות.
תזכורת לתפוגה מופעלת: הפעילו או השביתו תזכורת לתפוגת הפוד שתופעל כאשר יגיע מספר השעות שהגדרתם לפני ההשבתה.
שעות לפני כיבוי: מגדיר את מספר השעות לפני כיבוי הפוד הפעיל, שלאחר מכן תופעל תזכורת לתפוגה.
התראת מכל נמוך מופעלת: הפעלה או השבתה של התראה על יתרת יחידות אינסולין נמוכה מסף מוגדר.
מספר יחידות: מספר היחידות בהן מופעלת התראת המכל הנמוך.
הודעות
מספק התראות AAPS והתראות קוליות כאשר לא בטוח אם אירועי בזאלי זמני, SMB או בולוס הצליחו.
הערה: אלה הן התראות בלבד, לא מתבצעות התראות מסוג צפצופים.
התראת צליל של בזאלי זמני לא ברור מאופשרת: הפעילו או השביתו הגדרה זו כדי להפעיל התראה קולית והתראה חזותית כאשר AAPS לא בטוח אם מינון בזאלי זמני הוגדר בהצלחה.
התראת צליל של SMB לא ברור מאופשרת: הפעילו או השבחתו הגדרה זו כדי להפעיל התראה קולית והתראה חזותית כאשר AAPS אינו בטוח אם SMB הוזרק בהצלחה.
התראת צליל של בולוס לא ברור מאופשרת: הפעילו או השביתו הגדרה זו כדי להפעיל התראה קולית והתראה חזותית כאשר AAPS אינו בטוח אם בולוס הוזרק בהצלחה.
השמע כשהתראת הפסקת ההזרקה מאופשרת: הפעילו או השביתו הגדרה זו כדי להפעיל התראה קולית והתראה חזותית כאשר AAPS מעביר בהצלחה פקודת הפסקת הזרקה.
לשונית פעולות (ACT)
לשונית זו נסקרה היטב בתיעוד הראשי של AAPS אך ישנם בלשונית זו מספר פריטים שמשתנים בשימוש באומניפוד לעומת משאבות מבוססות צינוריות, במיוחד תהליכי תיחול פודים חדשים.
עברו ללשונית פעולות (ACT) מהמסך הראשי של AAPS.
תחת השורה פורטל הטיפולים (1), השדות אינסולין וצינורית ** יאופסו** ל-0 ימים ו-0 שעות לאחר כל החלפת פוד. זה נעשה בגלל האופן שבו משאבת אומניפוד בנויה ופועלת. מכיוון שהפוד מחדיר את הצינורית ישירות לעור באתר הדבקתו, אין שימוש בצינור מסורתי במשאבות אומניפוד. לכן לאחר החלפת פוד, הגיל של כל אחד מהערכים הללו יתאפס אוטומטית. גיל סוללת המשאבה אינו מדווח מכיוון שהסוללה בפוד תמיד תהיה יותר מאורך חיי הפוד (80 שעות לכל היותר). סוללת המשאבה ויתרת האינסולין נמצאים בעצמם בתוך כל פוד.
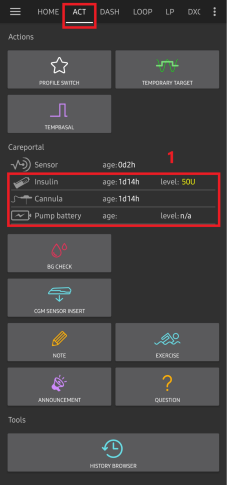
כמות במכל
יתרת אינסולין
יתרת האינסולין המוצגת מדווחת ע“י הפוד. עם זאת, הוא מדווח רק על יתרת אינסולין מדוייקת רק כאשר היא מתחת ל-50 יחידות. עד אז יוצג ”מעל 50 יחידות“. הכמות המדווחת אינה מדויקת: כאשר הפוד מדווח על »ריק« ברוב המקרים עדיין יישארו מספר יחידות אינסולין נוספות. לשונית הסקירה הכללית של DASH תוצג כמתואר להלן:
מעל 50 יחידות - הפוד מדווח על יותר מ-50 יחידות שנמצאות כעת במכל.
מתחת ל-50 יחידות - כמות האינסולין שנותרה במכל כפי שדווח על ידי הפוד.
הערות נוספות:
SMS - מחזירה ערך או 50+U בתגובות של SMS
נייטסקאוט - העלאת ערך של 50 כאשר מעל 50 יחידות לנייטסקאוט (גרסה 14.07 ומעלה). גרסאות חדשות יותר ידווחו על ערך של 50+ כאשר מעל 50 יחידות.
פתרון בעיות
הפסקת הזרקה
אין יותר כפתור של הפסקת הזרקה. אם ברצונכם ”להשהות“ את הפוד, אפשר להגדיר מינון בזאלי זמני 0% למשך x דקות.
במהלך החלפת פרופיל, Dash חייב להשעות את ההזרקה לפני הגדרת הפרופיל הבזאלי החדש. אם התקשורת נכשלת בין שתי הפקודות, אז ניתן להשהות את ההזרקה. כשזה קורה:
לא יהיה מתן אינסולין, כולל בזאלי, SMB, בולוס ידני וכו«.
ייתכן שתהיה הודעה על כך שאחת הפקודות אינה מאושרת: זה תלוי במועד התרחשות הכשל.
AAPS ינסה להגדיר את הפרופיל הבזאלי החדש כל 15 דקות.
AAPS יציג הודעה המודיעה שההזרקה הופסקה כל 15 דקות, אם ההזרקה עדיין מופסקת (חידוש ההזרקה נכשל).
הלחצן חידוש הזרקה יהיה פעיל אם המשתמש יבחר לחדש את ההזרקה באופן ידני.
אם AAPS לא מצליח לחדש את ההזרקה בעצמו (זה קורה אם הפוד אינו נגיש, הצליל מושתק וכו«), הפוד יתחיל לצפצף 4 פעמים בכל דקה למשך 3 דקות ולאחר מכן יחזור על עצמו כל 15 דקות אם ההזרקה עדיין מופסקת למשך יותר מ-20 דקות.
עבור פקודות לא ודאיות, ”רענון סטטוס הפוד“ אמור לאשר\לדחות אותן.
הערה: כאשר שומעים צפצופים מהפוד, אל תניחו שההזרקה תימשך מבלי לבדוק את הטלפון, ההזרקה עלולה להישאר מופסקת ולכן עליכם לוודא!
שגיאות בפוד
פודים נכשלים מדי פעם בשל מגוון בעיות, כולל בעיות חומרה של הפוד עצמו. הנוהג הטוב ביותר הוא לא להודיע אותם למשווק המשאבה, מכיוון ש- AAPS אינו מקרה שימוש מאושר. ניתן למצוא כאן רשימה של קודי תקלות כדי לסייע בקביעת הסיבה.
מניעת שגיאה 49 - כישלונות פוד
כשל זה קשור למצב פוד שגוי עבור פקודה או שגיאה במהלך פקודת אספקת אינסולין. זה קורה כאשר מנהל ההתקן והפוד אינם מסכימים על המצב בפועל. הפוד (כאמצעי בטיחות מובנה) מגיב עם קוד שגיאה 49 סופני (0x31) והפוד, בסופו של דבר, הופך למה שמכונה פוד ”צרחן“: צפצוף ארוך ומרגיז שניתן לעצור רק על ידי ניקוב חור במיקום מתאים בחלק האחורי של הפוד. לעתים קרובות קשה לברר את המקור המדויק של ”כשל פוד 49“. מצבים שיש חשד לכישלון זה (למשל בקריסות אפליקציה, הפעלת גרסת פיתוח או התקנה מחדש).
התראות המשאבה אינה נגישה
כאשר לא ניתן ליצור תקשורת עם הפוד למשך זמן מוגדר מראש תוצג התראה ”משאבה בלתי ניתנת להשגה“. ניתן להגדיר התראות על שלא ניתן להגיע למשאבה על ידי מעבר לתפריט שלוש הנקודות בצד שמאל למעלה, בחירה בהעדפות ← התראות מקומיות ← ** סף משאבה בלתי נגישה [min]**. הערך המומלץ הוא התראה לאחר 120 דקות.
ייצוא הגדרות
ייצוא הגדרות AndroidAPS מאפשר לשחזר את כל ההגדרות שלכם ואולי חשוב מכך, את כל המשימות שהשלמתם. ייתכן שיהיה עליכם לשחזר את ההגדרות ל“מצב העובד הידוע האחרון“ או לאחר הסרה\התקנה מחדש של AndroidAPS או במקרה של אובדן טלפון, התקנה מחדש בטלפון החדש.
הערה: מידע הפוד הפעיל כלול בהגדרות המיוצאות. אם אתה תייבאו קובץ מיוצא ”ישן“, הפוד הנוכחי ”ימות“. אין אלטרנטיבה אחרת. במקרים מסוימים (כמו שינוי טלפון מתוכנת), ייתכן שיהיה עליכם להשתמש בקובץ המיוצא כדי לשחזר את הגדרות AndroisAPS תוך שמירה על הפוד הפעיל הנוכחי. במקרה זה חשוב להשתמש רק בקובץ ההגדרות שיוצא לאחרונה המכיל את הפוד הפעיל כעת.
מומלץ לבצע ייצוא מיד לאחר הפעלת פוד. כך תמיד תוכלו לשחזר את החיבור אל הפוד הנוכחי במקרה של בעיה. למשל במקרה של מעבר לטלפון רזרבי.
העתיקו באופן קבוע את ההגדרות המיוצאות למקום בטוח (לדוגמה לכונן ענן) שניתן לגשת אליו בכל טלפון בעת הצורך (למשל במקרה של אובדן טלפון או איפוס להגדרות היצרן של הטלפון).
יבוא הגדרות
אזהרה שימו לב שייבוא הגדרות עלול לייבא סטטוס פוד מיושן. כתוצאה מכך, קיים סיכון לאיבוד הפוד הפעיל! (ראו ייצוא הגדרות). עדיף לנסות זאת רק כאשר אין אפשרויות אחרות זמינות.
בעת ייבוא הגדרות עם פוד פעיל, ודאו שהייצוא בוצע עם הפוד הפעיל הנוכחי.
ייבוא תוך כדי פוד פעיל: (אתם מסתכנים באיבוד הפוד!)
ודאו שאתם מייבאים הגדרות שיוצאו לאחרונה עם הפוד הפעיל כעת.
ייבוא הגדרות
בדיקת על ההגדרות
ייבוא (ללא פוד פעיל)
ייבוא כל קובץ מיוצא עדכני אמור לעבוד (ראה למעלה)
ייבאו את ההגדרות.
בדיקת על ההגדרות.
ייתכן שיהיה עליכם לבטל את הפוד ”הלא קיים“ אם הגדרות הייבוא כוללות נתוני פוד פעילים כלשהם.
ייבוא הגדרות המכילות מצב פוד מפוד לא פעיל
בעת ייבוא הגדרות המכילות נתונים עבור פוד שכבר אינו פעיל, AndroidAPS ינסה להתחבר אליו, מה שכמובן ייכשל. אין באפשרותכם להפעיל פוד חדש במצב זה.
כדי להסיר את הפוד הישן ”נסו“ לכבות את הפוד. הכיבוי ייכשל. בחרו ”נסה שוב“. לאחר הניסיון השני או השלישי תקבלו את האפשרות להסיר את הפוד. כשהפוד הישן כבוי תוכלו להפעיל אחד חדש.
התקנה מחדש של AndroidAPS
בעת הסרת AndroidAPS תאבדו את כל ההגדרות, ההתקדמות במשימות וההפעלה הנוכחית של הפוד. ע“מ לשחזר אותם ודאו שיש לכם קובץ הגדרות שיוצא לאחרונה זמין!
כאשר אתם עם פוד פעיל, ודאו גם שיש לכם קובץ שיוצא עם הפוד הנוכחי, אחרת תאבדו את הפוד הפעיל בעת ייבוא הגדרות ישנות יותר.
ייצאו את ההגדרות שלך ושמרו עותק במקום בטוח.
הסירו את התקנת AndroidAPS והפעילו מחדש את הטלפון.
התקינו גרסה חדשה של AndroidAPS.
ייבוא הגדרות
וודאו את כל ההעדפות (אפשר לייבא שוב הגדרות)
הפעילו פוד חדש
לבסוף: ייצאו קובץ הגדרות
עדכון AndroidAPS לגרסה חדשה יותר
ברוב המקרים אין צורך להסיר את ההתקנה. ניתן לבצע התקנה ”דורסת“ על ידי התחלת ההתקנה של הגרסה החדשה. זה אפשרי גם עם פוד פעיל.
ייבאו את ההגדרות.
התקינו את גרסת AndroidAPS החדשה.
ודאו שההתקנה הצליחה
המשיכו את השימוש בפוד הקיים או הפעילו פוד חדש.
לבסוף: ייצאו קובץ הגדרות.
התראות פוד
לידיעתכם, מנהל ההתקן של Dash מציג מגוון התראות ייחודיות בלשונית סקירה כללית, רובן אינפורמטיביות וניתנות לביטול בעוד שחלקן מספקות למשתמש פעולה לבצע על מנת לפתור את הסיבה להתראה המופעלת. להלן סיכום של ההתראות העיקריות בהן אתם עשויים להיתקל:
אין פוד פעיל לא נמצא פוד פעיל. ניתן לבטל התראה זו זמנית על ידי לחיצה על השתקה אך היא תמשיך לפעול כל עוד לא הופעל פוד חדש. לאחר הפעלת פוד, ההתראה הזו מושתקת אוטומטית.
התראה אינפורמטיבית כי פוד הושהה.
הגדרת הפרופיל הבזאלי נכשלה: ההזרקה עלולה להפסק! נא לרענן ידנית את סטטוס הפוד בלשונית Omnipod ולחדש את ההזרקה במידת הצורך. התראה אינפורמטיבית על כך שהגדרת הפרופיל הבזאלי של פוד נכשלה, ויהיה עליכם ללחוץ על רענן בלשונית DASH.
לא ניתן לאמת אם בולוס SMB הצליח. אם אתם בטוחים שהבולוס לא הצליח, עליכם למחוק את ערך SMB באופן ידני מטיפולים. התראה כי לא ניתן לאמת את הצלחת בולוס ה-SMB, יהיה עליכם לאמת את השדה בולוס אחרון בלשונית DASH כדי לראות האם ה-SMB הצליח ואם לא, להסיר את הערך מהלשונית טיפולים.
לא בטוח אם ”בולוס/בזאלי זמני/SMB“ הושלם, אנא ודאו ידנית אם הוא הצליח.
היכן ניתן לקבל עזרה בשימוש במנהל התקן DASH
כל עבודות פיתוח מנהל התקן האומניפוד נעשות על ידי הקהילה בהתנדבות; אנו מבקשים מכם להתחשב ולהשתמש בהנחיות הבאות בעת בקשת עזרה:
רמה 0 קראו את הסעיף הרלוונטי בתיעוד זה כדי להבטיח שאתם מבינים כיצד להשתמש במה שאתם מתקשים איתו.
רמה 1: אם אתם עדיין נתקלים בבעיות שאתם לא מצליחים לפתור באמצעות מסמך זה, אנא עברו לערוץ #androidaps ב-Discord באמצעות קישור ההזמנה.
רמה 2: חפשו בעיות קיימות כדי לראות אם הבעיה שלכם כבר דווחה ב-בעיות אם היא קיימת, אנא אשרו/הגיבו/הוסיפו מידע על הבעיה שלכם. אם לא, צרו בעיה חדשה וצרפו את קובצי היומן (Log) שלכם.
היו סבלניים - רוב חברי הקהילה שלנו מורכבים ממתנדבים בעלי אופי טוב, ופתרון בעיות דורש לעתים קרובות זמן וסבלנות מצד המשתמשים והמפתחים כאחד.