AAPS screens
Αρχική οθόνη
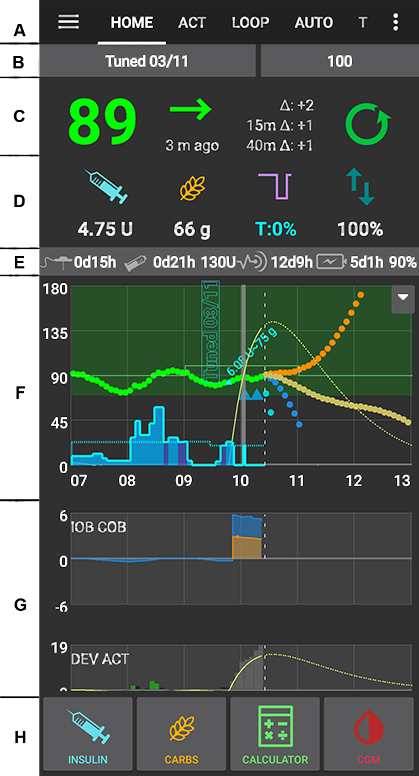
This is the first screen you will come across when you open AAPS and it contains most of the information that you will need day to day.
Ενότητα Α- Καρτέλες
Navigate between the various AAPS modules.
Alternatively you can change screens by swiping left or right.
Displayed tabs can be selected in config builder.
Section B - Profile & target
Current Profile
Current profile is displayed in the left bar.
Short press profile bar to view profile details
Long press profile bar to switch between different profiles.
If profile switch was made with duration remaining time in minutes is shown in brackets.
Target
Current target blood glucose level is displayed in the right bar.
Short press target bar to set a temporary target.
If temp target is set bar turns yellow and remaining time in minutes is shown in brackets.
Visualization of Dynamic target adjustment
AAPS can dynamically adjust your target based on sensitivity if you are using SMB algorithm.
Enable either one or both of the following options
«sensitivity raises target» and/or
«resistance lowers target»
If AAPS detects resistance or sensitivity the target will change from what is set from profile.
When it alters the target glucose background will change to green.
Section C - BG & loop status
Current blood glucose
Latest blood glucose reading from your CGM is shown on the left side.
Color of the BG value reflects the status to the defined range.
green = in range
red = below range
yellow = above range
The greyish block in the middle shows minutes since last reading and changes since last reading, in the last 15 and 40 minutes.
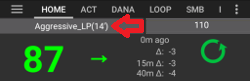
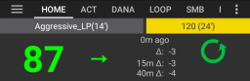
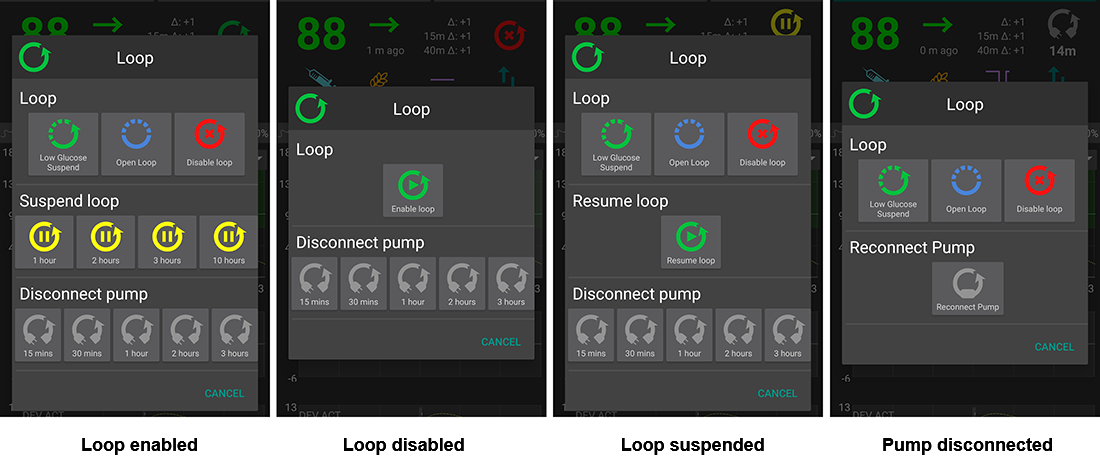
Loop status

A new icon shows loop status:
green circle = loop running
πράσινος κύκλος με διακεκομμένη γραμμή = αναστολή χαμηλής γλυκόζης (LGS)
κόκκινος κύκλος = κύκλωμα απενεργοποιημένο (δε λειτουργεί μόνιμα)
κίτρινος κύκλος = κύκλωμα σε αναστολή (προσωρινά σε παύση, αλλά θα δοθεί βασική ινσουλίνη) - ο χρόνος που υπολείπεται φαίνεται κάτω από το εικονίδιο
γκρι κύκλος = αντλία αποσυνδεδεμένη (προσωρινά δεν υπάρχει καθόλου δόση ινσουλίνης) - ο χρόνος που απομένει φαίνεται κάτω από το εικονίδιο
Πορτοκαλί κύκλος = super bolus ενεργό - ο χρόνος που απομένει εμφανίζεται κάτω από το εικονίδιο
μπλε κύκλος με διακεκομμένη γραμμή = ανοικτό κύκλωμα
Short press or Long press the icon to open the Loop dialog to switch loop mode (Close, Low Glucose Suspend, Open or Disable), suspend / re-enable loop or disconnect / reconnect pump.
If short press on Loop icon, a validation is required after selection in Loop Dialog
Προειδοποιητικό σήμα γλυκόζης αίματος
Beginning with Android 3.0, you might get a warning signal beneath your BG number on the main screen.
Note: Up to 30h hours are taken into accord for AAPS calculations. So even after you solved the origin problem, it can take about 30 hours for the yellow triangle to disappear after the last irregular interval occurred.
Για να το αφαιρέσετε αμέσως, πρέπει να διαγράψετε χειροκίνητα μερικές καταχωρήσεις από την καρτέλα Dexcom/xDrip+.
Ωστόσο, όταν υπάρχουν πολλές διπλές καταχωρήσεις, μπορεί να είναι ευκολότερο να
να επαναφέρετε τη βάση δεδομένων στο μενού συντήρησης και
Κόκκινο προειδοποιητικό σημάδι: Διπλά δεδομένα γλυκόζης αίματος
Το κόκκινο προειδοποιητικό σήμα σας προειδοποιεί να ενεργήσετε άμεσα: Λαμβάνετε διπλά δεδομένα γλυκόζης αίματος, τα οποία εμποδίζουν το κύκλωμα να δουλέψει σωστά. Ως εκ τούτου, το κύκλωμά σας θα απενεργοποιηθεί μέχρι να επιλυθεί.

Θα πρέπει να βρείτε γιατί παίρνετε διπλά δεδομένα γλυκόζης αίματος:
Is Dexcom bridge enabled on your NS site? Disable the bridge by going to heroku (or any other hosting provider), edit the «enable» variable and remove the «bridge» part there. (Για το heroku λεπτομέρειες μπορείτε να βρείτε εδώ.)
Do multiple sources upload your BG to NS? If you use the BYODA app, enable the upload in AAPS but do not enable it in xDrip+, if you use that.
Do you have any followers that might receive your BG but do also upload it again to your NS site?
Last resort: In AAPS, go to your NS Client settings, select the sync settings and disable the «Accept CGM data from NS» option.
Κίτρινο προειδοποιητικό σημάδι
The yellow warning signal is indicating that your BG arrived in irregular time intervals or some BGs are missing.

Συνήθως δεν χρειάζεται να κάνετε κάτι. Το κλειστό κύκλωμα θα συνεχίσει να λειτουργεί!
As a sensor change is interupting the constant flow of BG data a yellow warning sign after sensor change is normal and nothing to worry about.
Ειδική σημείωση για τους χρήστες libre:
Όλα τα libre χάνουν ένα ή δύο λεπτά κάθε λίγες ώρες, πράγμα που σημαίνει ότι δεν έχετε ποτέ μια τέλεια ροή κανονικών χρονικών διαστημάτων γλυκόζης αίματος.
Also jumpy readings interrupt the continous flow.
Therefore the yellow warning sign will be “always on” for libre users.
Section D - IOB, COB, BR and AS
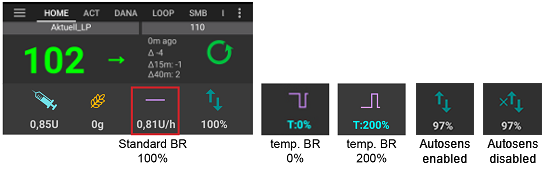
Syringe: insulin on board (IOB) - amount of active insulin inside your body
The insulin on board figure would be zero if just your standard basal was running and there was no insulin remaining from previous boluses.
IOB may be negative if there have recently been periods of reduced basal.
Πιέστε το εικονίδιο για να δείτε το διαχωρισμό της γευματικής και της βασικής ινσουλίνης
Grain: carbs on board (COB) - yet unabsorbed carbs you have eaten before -> icon pulses if carbs are required
Purple line: basal rate - icon changes reflecting temporary changes in basal rate (flat at 100%)
Press the icon to see the base basal rate and details of any temp basal (including remaining duration)
Arrows up & down: indicating actual autosens status (enabled or disabled) and value is shown below icon
Απαιτούνται υδατάνθρακες
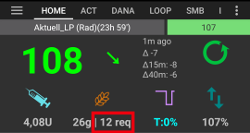
Οι προτάσεις υδατανθράκων δίνονται όταν το πλάνο αναφοράς ανιχνεύει ότι απαιτούνται υδατάνθρακες.
Αυτό συμβαίνει όταν ο αλγόριθμος oref θεωρεί ότι δεν μπορεί να σας γλυτώσει με 0 (μηδέν) προσωρινό ρυθμό και θα χρειαστείτε υδατάνθρακες για να διορθωθεί η κατάσταση.
Οι ειδοποιήσεις υδατανθράκων είναι πολύ πιο εξελιγμένες από αυτές του υπολογιστή γεματικής δόσης. You might see carbs suggestion whilst bolus calculator does not show missing carbs.
Carb required notifications can be pushed to Nightscout if wished, in which case an announcement will be shown and broadcast.
Section E - Status lights
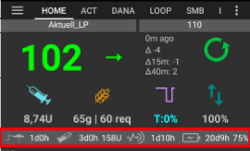
Status lights give a visual warning for
Cannula age
Insulin age (days reservoir is used)
Reservoir level (units)
Sensor age
Battery age and level (%)
If threshold warning is exceeded, values will be shown in yellow.
If threshold critical is exceeded, values will be shown in red.
Settings can be made in preferences.
Section F - Main graph
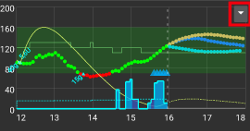
Graph shows your blood glucose (BG) as read from your glucose monitor (CGM).
Notes entered in action tab such as fingerstick calibrations and carbs entries as well as profile switches are shown here.
Long press on the graph to change the time scale. You can choose 6, 12, 18 or 24 hours.
The green area reflects your target range. It can be configured in preferences.
Blue triangles show SMB - if enabled in preferences.
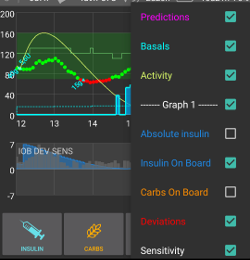
Optional information:
Προβλέψεις
Basals
Activity - insulin activity curve
Activate optional information
Click the triangle on the right side of the main graph to select which information will be displayed in the main graph.
For the main graph just the three options above the line «——- Graph 1 ——-» are available.
Prediction lines
Orange line: COB (colour is used generally to represent COB and carbs)
Η γραμμή πρόβλεψης δείχνει πού θα πάει η γλυκόζη σας (όχι οι ίδιοι οι Ενεργοί Υδατάνθρακες!) με βάση τις τρέχουσες ρυθμίσεις της αντλίας και υποθέτοντας ότι οι αποκλίσεις λόγω απορρόφησης υδατανθράκων παραμένουν σταθερές. Αυτή η γραμμή εμφανίζεται μόνο εάν υπάρχουν γνωστοί Ενεργοί Υδατάνθρακες.
Σκούρη μπλε γραμμή: Ενεργή ινσουλίνη (το χρώμα χρησιμοποιείται γενικά για να αντιπροσωπεύει την Ενεργή Ινσουλίνη και την ινσουλίνη)
Η γραμμή πρόβλεψης δείχνει τι θα συνέβαινε με την επίδραση μόνο της ινσουλίνης. Για παράδειγμα, αν έχετε εισάγει κάποια ινσουλίνη και στη συνέχεια δεν φάτε υδατάνθρακες.
Ανοιχτή μπλε γραμμή: μηδενικός προσωρινός ρυθμός (προβλεπόμενη γλυκόζη αίματος αν θα οριζόταν προσωρινός βασικός ρυθμός στο 0%)
Η γραμμή πρόβλεψης δείχνει πώς θα άλλαζε η πορεία της Ενεργής Ινσουλίνης αν η αντλία σταματούσε όλη την παροχή ινσουλίνης (0% προσωρινός βασικός ρυθμός).
Αυτή η γραμμή εμφανίζεται μόνο όταν χρησιμοποιείται ο αλγόριθμος SMB.
**Σκούρη κίτρινη Γραμμή **: ΜΚΓ (μη καταχωρημένα γεύματα)
Unannounced meals means that a significant increase in glucose levels due to meals, adrenaline or other influences is detected. Prediction line is similar to the ORANGE COB line but it assumes that the deviations will taper down at a constant rate (by extending the current rate of reduction).
Αυτή η γραμμή εμφανίζεται μόνο όταν χρησιμοποιείται ο αλγόριθμος SMB.
Σκούρη πορτοκαλί γραμμή: εΕΥ (επιταχυνόμενη απορρόφηση υδατανθράκων)
Παρόμοια με τους Ενεργούς Υδατάνθρακες, αλλά υποθέτοντας ένα στατικό ρυθμό απορρόφησης υδατανθράκων 10 mg/dL/5m (-0.555 mmol/l/5m). Deprecated and of limited usefulness.
Αυτή η γραμμή εμφανίζεται μόνο όταν χρησιμοποιείται ο παλιότερος αλγόριθμος AMA.
Usually your real glucose curve ends up in the middle of these lines, or close to the one which makes assumptions that closest resemble your situation.
Basals
A solid blue line shows the basal delivery of your pump and reflects the actual delivery over time.
The dotted blue line is what the basal rate would be if there were no temporary basal adjustments (TBRs).
In times standard basal rate is given the area under the curve is shown in dark blue.
When the basal rate is temporarily adjusted (increased or decreased) the area under the curve is shown in light blue.
Άσκηση
The thin yellow line shows the activity of Insulin.
It is based on the expected drop in BG of the insulin in your system if no other factors (like carbs) were present.
Section G - additional graphs
You can activate up to four additional graphs below the main graph.
To open settings for additional graphs click the triangle on the right side of the main graph and scroll down.
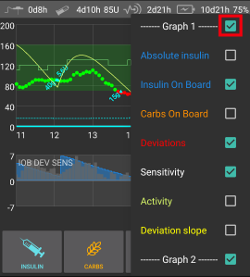
To add an additional graph check the box on the left side of its name (i.e. ——- Graph 1 ——-).
Absolute insulin
Active insulin including boluses and basal.
Insulin on board
Shows the insulin you have on board (= active insulin in your body). It includes insulin from bolus and temporary basal (but excludes basal rates set in your profile).
If there were no SMBs, no boluses and no TBR during DIA time this would be zero.
IOB can be negative if you have no remaining bolus and zero/low temp for a longer time.
Decaying depends on your DIA and insulin profile settings.
Ενεργοί Υδατάνθρακες
Shows the carbs you have on board (= active, not yet decayed carbs in your body).
Decaying depends on the deviations the algorithm detects.
If it detects a higher carb absorption than expected, insulin would be given and this will increase IOB (more or less, depending on your safety settings).
Αποκλίσεις
GREY bars show a deviation due to carbs.
GREEN bars show that BG is higher than the algorithm expected it to be. Green bars are used to increase resistance in Autosens.
RED bars show that BG is lower than the algorithm expected. Red bars are used to increase sensitivity in Autosens.
YELLOW bars show a deviation due to UAM.
BLACK bars show small deviations not taken into account for sensitivity
Ευαισθησία
Shows the sensitivity that Autosens has detected.
Sensitivity is a calculation of sensitivity to insulin as a result of exercise, hormones etc.
Άσκηση
Shows the activity of insulin, calculated by your insulin profile (it’s not derivative of IOB).
The value is higher for insulin closer to peak time.
It would mean to be negative when IOB is decreasing.
Deviation slope
Internal value used in algorithm.
Section H - Buttons
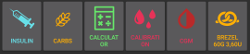
Buttons for insulin, carbs and Calculator are almost’always on”.
If connection to pump is lost, the insulin button will not be visible.
Other Buttons have to be setup in [preferences]Preferences-buttons).
Ινσουλίνη
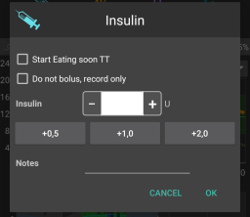
To give a certain amount of insulin without using bolus calculator.
By checking the box you can automatically start your eating soon temp target.
If you do not want to bolus through pump but record insulin amount (i.e. insulin given by syringe) check the corresponding box.
Υδατάνθρακες
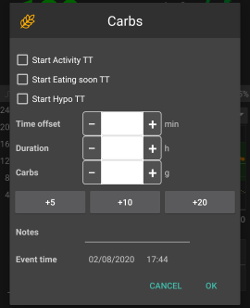
To record carbs without bolusing.
Certain pre-set temporary targets can be set directly by checking the box.
Time offset: When will you / have you been eaten carbs (in minutes).
Duration: To be used for «extended carbs»
You can use the buttons to quickly increase carb amount.
Notes will be uploaded to Nightscout - depending on your settings for NS client.
Υπολογιτής
See Bolus Wizard section below
Calibrations
Sends a calibration to xDrip+ or opens Dexcom calibration dialogue.
Must be activated in preferences.
CGM
Opens xDrip+.
Back button returns to AAPS.
Must be activated in preferences.
Quick Wizard
Easily enter amount of carbs and set calculation basics.
Details are setup in preferences.
Bolus Wizard
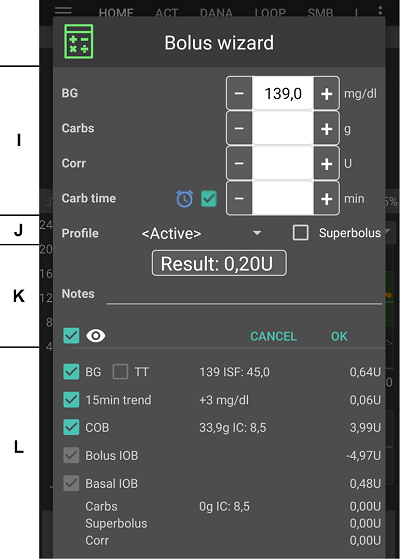
Όταν θέλετε να κάνετε ένα bolus γεύματος, αυτό θα το κάνετε κανονικά από.
Section I
BG field is normally already populated with the latest reading from your CGM. Εάν δεν έχετε λειτουργικό CGM τότε θα είναι κενό.
In the CARBS field you add your estimate of the amount of carbs - or equivalent - that you want to bolus for.
The CORR field is if you want to modify the end dosage for some reason.
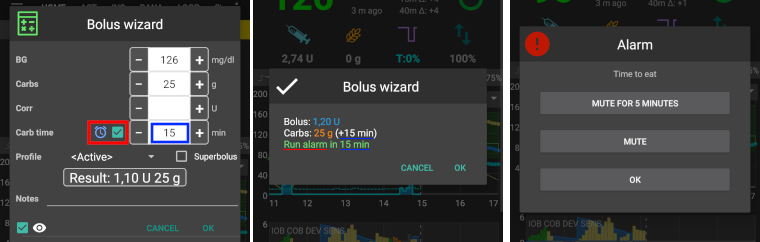
The CARB TIME field is for pre-bolusing so you can tell the system that there will be a delay before the carbs are to be expected. Μπορείτε να βάλετε έναν αρνητικό αριθμό σε αυτό το πεδίο αν κάνετε bolusing για προηγούμενους υδατάνθρακες.
Eating reminder
For carbs in the future the alarm checkbox can be selected (and is by default when a time in the future is entered) so that you can be reminded at a time in the future of when to eat the carbs you have input into AAPS
Section J
SUPER BOLUS is where the basal insulin for the next two hours is added to the immediate bolus and a zero TBR is issued for the following two hours to take back the extra insulin. The option only shows when «Enable superbolus in wizard» is set in the preferences overview.
Η ιδέα είναι να παραδώσουμε την ινσουλίνη νωρίτερα και ελπίζουμε να μειώσουμε τις απότομες μεταβολές.
For details visit diabetesnet.com.
Section K
Εμφανίζει το υπολογισμένο bolus.
If the amount of insulin on board already exceeds the calculated bolus then it will just display the amount of carbs still required.
Notes will be uploaded to Nightscout - depending on your settings for NS client.
Section L
Details of wizard’s bolus calculation.
You can deselect any that you do not want to include but you normally wouldn’t want to.
For safety reasons the TT box must be ticked manually if you want the bolus wizard to calculate based on an existing temporary target.
Συνδυασμοί COB και IOB και τι σημαίνουν
For safety reasons IOB boxed cannot be unticked when COB box is ticked as you might run the risk of too much insulin as AAPS is not accounting for what’s already given.
If you tick COB and IOB unabsorbed carbs that are not already covered with insulin + all insulin that has been delivered as TBR or SMB will be taken into account.
If you tick IOB without COB, AAPS takes account of already delivered insulin but won’t cover that off against any carbs still to be absorbed. Αυτό οδηγεί σε μια ειδοποίηση σχετικά με την «εξαφάνιση των υδατανθράκων».
If you bolus for additional food shortly after a meal bolus (i.e. additional desert) it can be helpful to untick all boxes. This way just the new carbs are being added as the main meal won’t necessarily be absorbed so IOB won’t match COB accurately shortly after a meal bolus.
Wrong COB detection
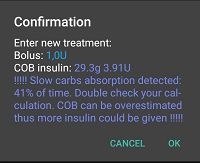
If you see the warning above after using bolus wizard, AAPS has detected that the calculated COB value maybe wrong.
So, if you want to bolus again after a previous meal with COB you should be aware of overdosing!
For details see the hints on COB calculation page.
Action tab
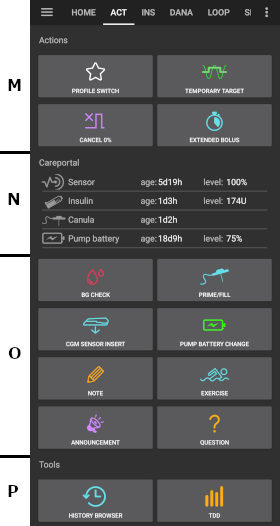
Actions - section M
Button profile switch as an alternative to pressing the current profile on homescreen.
Button temporary target as an alternative to pressing the current target on homescreen.
Button to start or cancel a temporary basal rate. Please note that the button changes from “TEMPBASAL” to “CANCEL x%” when a temporary basal rate is set.
Even though extended boluses do not really work in a closed loop environment some people were asking for an option to use extended bolus anyway.
This option is only available for Dana RS and Insight pumps.
Closed loop will automatically be stopped and switched to open loop mode for the time running extended bolus.
Make sure to read the details before using this option.
Careportal - section N
Displays information on
sensor age & level (battery percentage)
insulin age & level (units)
cannula age
pump battery age & level (percentage
Less information will be shown if low resolution skin is used.
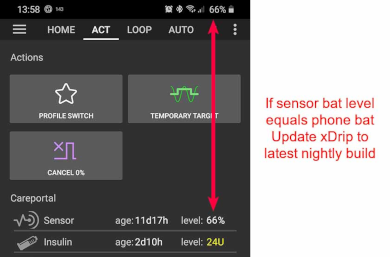
Sensor level (battery)
Needs xDrip+ nightly build Dec. 10, 2020 or newer.
Works for CGM with additional transmitter such as MiaoMiao 2. (Technically sensor has to send cat level information to xDrip+.)
Thresholds can be set in preferences.
If sensor level is the same as phone battery level you xDrip+ version is probably too old and needs an update.
Careportal - section O
BG check, prime/fill, sensor insert and pump battery change are the base for the data displayed in section N.
Prime/Fill allows you to record pump site and insulin cartridge change.
Section O reflects the Nightscout careportal. So exercise, announcement and question are special forms of notes.
Tools - section P
History Browser
Allows you to ride back in AAPS history.
TDD
Total daily dose = bolus + basal per day
Μερικοί γιατροί χρησιμοποιούν - ειδικά για νέες αντλίες - μια αναλογία βασικού ρυθμού προς bolus 50:50.
Therefore ratio is calculated as TDD / 2 * TBB (Total base basal = sum of basal rate within 24 hours).
Άλλοι προτιμούν το εύρος από 32% έως 37% του TDD για TBB.
Όπως και οι περισσότεροι από αυτούς τους κανόνες, είναι περιορισμένης πραγματικής εγκυρότητας. Σημείωση: Ο διαβήτης σας μπορεί να διαφέρει!

Προφίλ ινσουλίνης
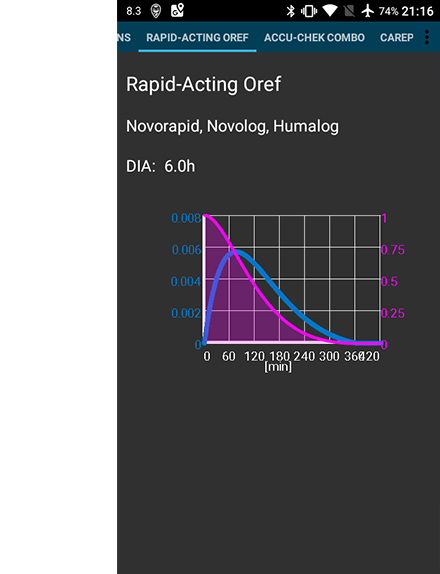
This shows the activity profile of the insulin you have chosen in config builder.
The PURPLE line shows how much insulin remains after it has been injected as it decays with time and the BLUE line shows how active it is.
The important thing to note is that the decay has a long tail.
If you have been used to manual pumping you have probably been used to assuming that insulin decays over about 3.5 hours.
However, when you are looping the long tail matters as the calculations are far more precise and these small amounts add up when they are subjected to the recursive calculations in the AAPS algorithm.
For a more detailed discussion of the different types of insulin, their activity profiles and why all this matters you can read an article here on Understanding the New IOB Curves Based on Exponential Activity Curves
And you can read an excellent blog article about it here: Why we are regularly wrong in the duration of insulin action (DIA) times we use, and why it matters…
And even more at: Exponential Insulin Curves + Fiasp
Pump Status
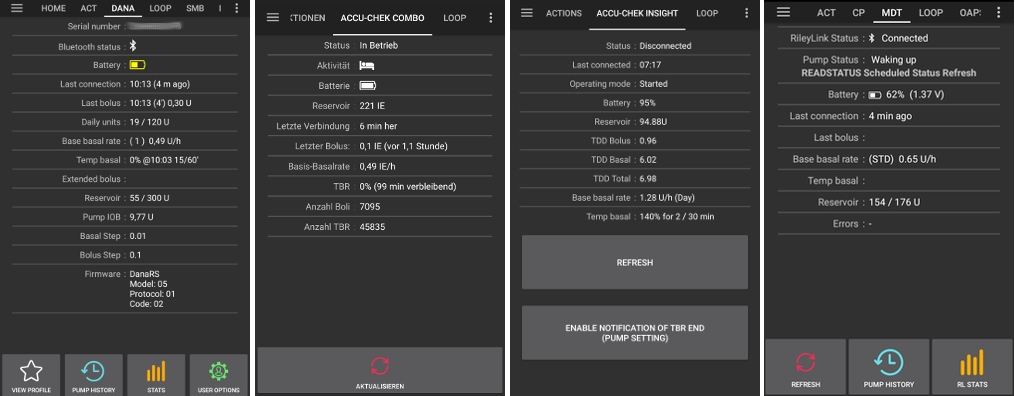
Different information on pump status. Displayed information depends on your pump model.
See pumps page for details.
Care Portal
Careportal replicated the functions you will find on your Nightscout screen under the “+” symbol which allows you to add notes to your records.
Review carb calculation
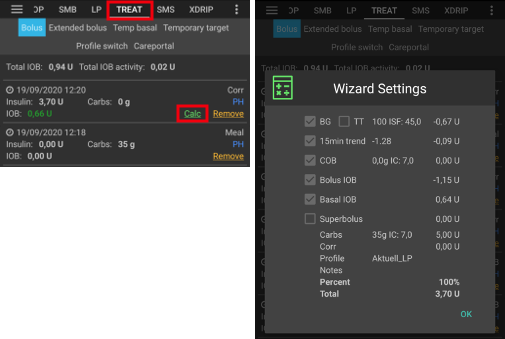
If you have used the Bolus Wizard to calculate insulin dosage you can review this calculation later on ts tab.
Just press the green Calc link. (Depending on pump used insulin and carbs can also be shown in one single line in ts.)
Carb correction
Treatment tab can be used to correct faulty carb entries (i.e. you over- or underestimated carbs).
Check and remember actual COB and IOB on homescreen.
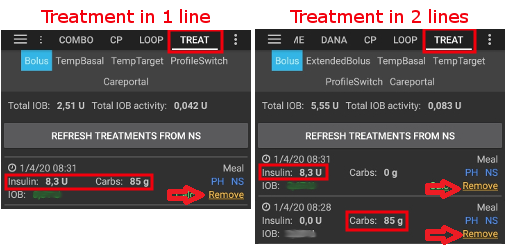
Depending on pump in treatment tab carbs might be shown together with insulin in one line or as a separate entry (i.e. with Dana RS).
Remove the entry with the faulty carb amount.
Make sure carbs are removed successfully by checking COB on homescreen again.
Do the same for IOB if there is just one line in treatment tab including carbs and insulin.
-> If carbs are not removed as intended and you add additional carbs as explained here (6.), COB will be too high and that might lead to too high insulin delivery.
Enter correct carb amount through carbs button on homescreen and make sure to set the correct event time.
If there is just one line in treatment tab including carbs and insulin you have to add also the amount of insulin. Make sure to set the correct event time and check IOB on homescreen after confirming the new entry.
Loop, AMA / SMB
These tabs show details about the algorithm’s calculations and why AAPS acts the way it does.
Calculations are each time the system gets a fresh reading from the CGM.
For more details see APS section on config builder page.
Προφίλ
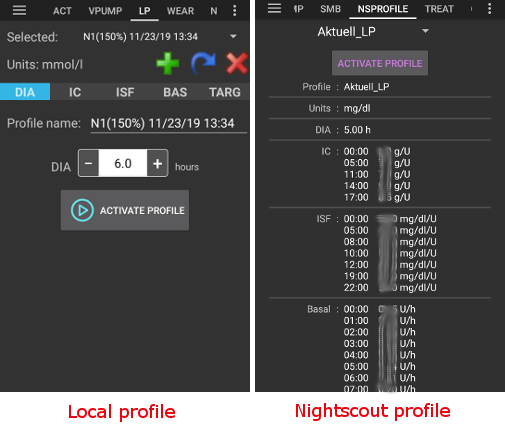
Profile contains information on your individual diabetes settings:
DIA (Duration of Insulin Action)
IC or I:C: Insulin to Carb ratio
ISF: Insulin Sensitivity Factor
Basal rate
Target: Blood glucose level that you want AAPS to be aiming for
As of version 3.0 only local profile is possible. The local profile can be edited on your smartphone and synced to your Nightscout site.
Treatment
History of the following treatments:
Bolus & carbs -> option to remove entries to correct history
Temporary basal rate
Careportal - notes entered through action tab and notes in dialogues
BG Source - xDrip+, BYODA…
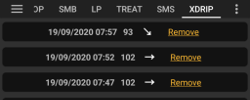
Depending on your BG source settings this tab is named differently.
Shows history of CGM readings and offers option to remove reading in case of failure (i.e. compression low).
NSClient
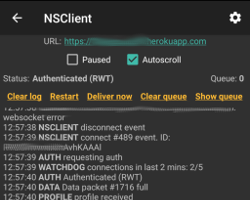
Displays status of the connection with your Nightscout site.
Settings are made in preferences. You can open the corresponding section by clicking the cog wheel on the top right side of the screen.
For troubleshooting see this page.