Objectives as of Android APS 2.8.2.1
This is not the latest version of the Android APS Objectives. This page details the Objectives that were in place prior to version 3.0. Anyone using an older version of Android (i.e. prior to Android 9) and Android APS version 2.8.2.1 should refer to this page.
Please see this page for the current set of Objectives.
Το AndroidAPS διαθέτει μια σειρά στόχων που πρέπει να ολοκληρωθούν για να σας καθοδηγήσουν στα χαρακτηριστικά και τις ρυθμίσεις του ασφαλούς κυκλώματος. Εξασφαλίζουν ότι έχετε ρυθμίσει σωστά όλες τις λεπτομέριες στις παραπάνω ενότητες και ότι καταλαβαίνετε τι κάνει το σύστημά και γιατί μπορείτε να το εμπιστευτείτε.
If you are upgrading phones then you can export your settings to keep your progress through the objectives. Not only will your progress through the objectives be saved, but also your safety settings such as max bolus etc. If you do not export and import your settings then you will need to start the objectives from the beginning again. It is a good idea to backup your settings frequently just in case.
If you want to go back in objectives see explanation below.
Στόχος 1: Δημιουργία οπτικοποίησης και παρακολούθησης, ανάλυση βασικού δεδομένων και αναλογιών
Select the right blood glucose source for your setup. See BG Source for more information.
Select the right Pump in ConfigBuilder (select Virtual Pump if you are using a pump model with no AndroidAPS driver for looping) to ensure your pump status can communicate with AndroidAPS.
If using DanaR pump then ensure you have followed DanaR Insulin Pump instructions to ensure the link between pump and AndroidAPS.
Follow instructions in Nightscout page to ensure Nightscout can receive and display this data.
Note that URL in NSClient must be WITHOUT /api/v1/ at the end - see NSClient settings in Preferences.
You may need to wait for the next blood glucose reading to arrive before AndroidAPS will recognise it.
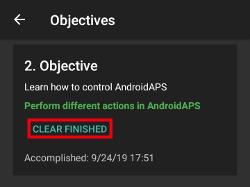
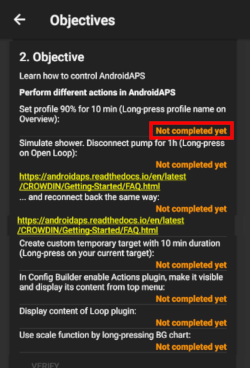
Objective 2: Learn how to control AndroidAPS
Perform several actions in AndroidAPS as described in this objective.
Click on the orange text «Not completed yet» to access the to-dos.
Links will be provided to guide you in case you are not familiar with a specific action yet.
Objective 3: Prove your knowledge
Pass a multiple-choice exam testing your AndroidAPS knowledge.
Click on the orange text «Not completed yet» to access the page with the question and answering options.
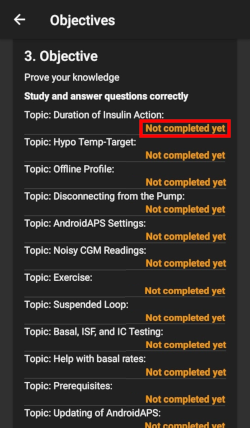
Links will be provided to guide you in case you are unsure about the correct answers yet.
The questions for objective 3 have been completely rewritten by native speakers as of AAPS 2.8. The new ones cover the same basic topics plus a few new ones.
These new questions will lead to some not answered questions even though you have successfully completed objective 3 in previous versions.
Unanswered questions will affect you only if you start a new objective. In other words: If you have already completed all objectives you can wait and answer the new questions later without loosing AAPS functions.
Objective 4: Starting on an open loop
Select Open Loop either from Preferences, or by pressing and holding the Loop button in top left of the home screen.
Work through the Preferences to set up for you.
Manually enact at least 20 of the temporary basal rate suggestions over a period of 7 days; input them to your pump and confirm in AndroidAPS that you have accepted them. Βεβαιωθείτε ότι τα δεδομένα αυτά εμφανίζονται σε AndroidAPS και Nightscout.
Enable temp targets if necessary. Χρησιμοποιήστε στόχους υπογλυκαιμίας για να αποφύγετε ότι το σύστημα θα διορθώσει πολύ έντονα λόγω αύξησης της γλυκόζης αίματος μετά από υπογλυκαιμία.
Reduce number of notifications
To reduce the Number of decisions to be made while in Open Loop set wide target range like 90 - 150 mg/dl or 5,0 - 8,5 mmol/l.
You might even want to wider upper limit (or disable Open Loop) at night.
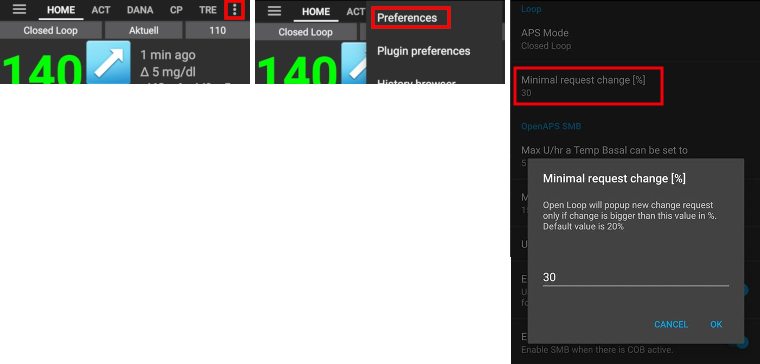
In Preferences you can set a minimum percentage for suggestion of basal rate change.
Also, you do not need to act every 5 minutes on all suggestions…
Objective 5: Understanding your open loop, including its temp basal recommendations
Start to understand the thinking behind the temp basal recommendations by looking at the determine basal logic and both the forecast line in AndroidAPS homescreen/Nightscout and the summary of outputs from the calculations in your OpenAPS tab.
Θα θελήσετε να ορίσετε το στόχο σας υψηλότερο από το συνηθισμένο έως ότου είστε σίγουροι για τους υπολογισμούς και τις ρυθμίσεις. System allows
a low target to be a minimum of 4 mmol (72 mg/dl) or maximum of 10 mmol (180 mg/dl)
a high target to be a minimum of 5 mmol (90 mg/dl) and maximum of 15 mmol (225 mg/dl)
a temporary target as a single value can be anywhere in the range of 4 mmol to 15 mmol (72 mg/dl to 225 mg/dl)
Ο στόχος είναι η τιμή στην οποία βασίζονται οι υπολογισμοί και όχι η ίδια με εκείνη που στοχεύετε να διατηρείτε τις τιμές γλυκόζης στο αίμα σας μέσα. If your target is very wide (say, 3 or more mmol [50 mg/dl or more] wide), you will often find little AAPS action. This is because blood glucose is eventually predicted to be somewhere in that wide range and therefore not many fluctuating temporary basal rates are suggested.
You may want to experiment with adjusting your targets to be a closer together range (say, 1 or less mmol [20 mg/dl or less] wide) and observe how the behavior of your system changes as a result.
You can view a wider range (green lines) on the graph for the values you aim to keep your blood glucose within by entering different values in Preferences > Range for Visualisation.

Σταματήστε εδώ αν είστε σε ανοιχτό κύκλωμα με μια εικονική αντλία - μην κάνετε κλικ στην επιλογή Επαλήθευση στο τέλος αυτού του στόχου.

Objective 6: Starting to close the loop with Low Glucose Suspend

Closed loop will not correct high bg values in objective 6 as it is limited to low glucose suspend. Οι υψηλές τιμές BG πρέπει να διορθωθούν χειροκίνητα από εσάς!
Select Closed Loop either from Preferences or by pressing and holding the Open Loop button in the top left of the home screen.
Set your target range slightly higher than you usually aim for, just to be safe.
Watch how temporary basals are active by viewing the blue basal text on the homescreen or the blue basal render on the homescreen graph.
Ensure your settings have supported AndroidAPS to avoid having to treat a low glucose over a period of 5 days. Εάν εξακολουθείτε να εμφανίζετε συχνά ή σοβαρά επεισόδια χαμηλής γλυκόζης, εξετάστε το ενδεχόμενο αλλαγής των αναλογιών DIA, βασικών, ISF και υδατανθράκων.
You don’t have to change your settings. During objective 6 maxIOB setting is internally set to zero automatically. This override will be reversed when moving to objective 7.
The system will override your maxIOB settings to zero, which means if blood glucose is dropping it can reduce basal for you, but if blood glucose is rising then it will only increase basal if the basal IOB is negative (from a previous Low Glucose Suspend), otherwise basal rates will remain the same as your selected profile.
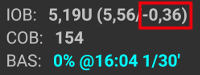
If your basal IOB is negative (see screenshot above) a TBR > 100% can be issued also in objective 6.
You may temporarily experience spikes following treated hypos without the ability to increase basal on the rebound.
Objective 7: Tuning the closed loop, raising max IOB above 0 and gradually lowering BG targets
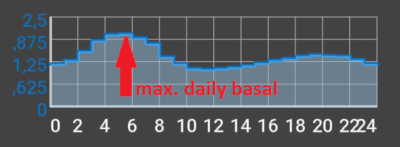
Raise your “Maximum total IOB OpenAPS can’t go over” (in OpenAPS called “max-iob”) above 0 over a period of 1 day, the default recommendation is «average mealbolus + 3x max daily basal»(for SMB algorithm) or «3x max daily basal» (for older AMA algorithm) but you should slowly work up to this until you know your settings work for you (max daily basal = the maximum hourly value in any time segment of the day).
Αυτή η σύσταση πρέπει να θεωρηθεί ως σημείο εκκίνησης. Εάν ρυθμίσετε στο 3x και βλέπετε κινήσεις που σας ωθούν έντονα και γρήγορα τότε μειώστε τον αριθμό. Εάν είστε πολύ ανθεκτικοί, αυξήστε το πολύ λίγο τη φορά.
Once confident on how much IOB suits your looping patterns then reduce your targets to your desired level.
Objective 8: Adjust basals and ratios if needed, and then enable autosens
You can use autotune as a one off to check your basals remain accurate or do a traditional basal test.
Enable autosens over a period of 7 days and watch the white line on the homescreen graph show how your sensitivity to insulin may be rising or falling as a result of exercise or hormones etc. and keep an eye in the OpenAPS report tab how AndroidAPS is adjusting the basals and/or targets accordingly.
Don’t forget to record your looping in this form logging AndroidAPS as your type of DIY loop software, if you have not already done so.
Objective 9: Try additional features for daytime use and gain confidence in your closed loop system
Before AAPS version 2.7 meal assist (MA) was the basic algorithm for AAPS and completing objective 8 was necessary to activate advanced meal assist (AMA).
As advanced meal assist (AMA) is the standard algorithm from AAPS version 2.7 onwards use the following 28 days to try features you haven’t used yet and get more confident with you closed loop system.
Objective 10: Enabling additional oref1 features for daytime use, such as super micro bolus (SMB)
You must read the SMB chapter in this wiki and chapter oref1 in openAPSdocs to understand how SMB works, especially what’s the idea behind zero-temping.
Then you ought to rise maxIOB to get SMBs working fine. η μέγιστη IOB περιλαμβάνει τώρα όλα τα IOB, όχι μόνο βασικά. That is, if given a bolus of 8 U for a meal and maxIOB is 7 U, no SMBs will be delivered until IOB drops below 7 U. A good start is maxIOB = average mealbolus + 3x max daily basal (max daily basal = the maximum hourly value in any time segment of the day - see objective 7 for an illustration)
min_5m_carbimpact default in absorption settings has changed from 3 to 8 going from AMA to SMB. If you are upgrading from AMA to SMB, you have to change it manually.
Objective 11: Automation
You have to start objective 11 to be able to use Automation.
Make sure you have completed all objectives including exam ../Usage/Objectives.md#objective-3-prove-your-knowledge.
Completing previous objectives will not effect other objectives you have already finished. You will keep all finished objectives!
Go back in objectives
If you want to go back in objectives for whatever reason you can do so by clicking at «clear finished».