Browser build: troubleshooting
Note
This page collects troubleshooting tips for the Browser build.
AAPS Builder
Step 1: the repository
“my-aaps already exists in this account”

You already have this repository, for example from an earlier attempt. Close the GitHub tab, keep that name in step 1 of the setup page and go on. If you already did steps 2 and 3 for it, your key is still in it: continue with step 4. If it was made with an earlier version of the setup page, update its workflow once as explained in Updating AAPS. You prefer a fresh start? Type another name, for example my-aaps-2, and use the same keystore in step 2.
“No GitHub user with this name”

“No GitHub user with this name” in step 1: type your GitHub username, as shown in your GitHub profile, not your e-mail.
No “Build AAPS” or “Run workflow” button, or the repository is empty: the repository was not created from the template. Delete it (Settings → bottom of the page → Delete this repository) and do step 1 again with the Create my private repository button.
Step 3: the secret
“Page not found” (404)

“Page not found” (404) when the setup page opens GitHub: log in to github.com in the same browser (GitHub shows 404 for private repositories when you are not logged in). If you are logged in, the username or repository name in step 1 of the setup page does not match your repository. Type the exact names.
Step 4: the build
“This workflow does not exist”

Right after the repository is created, GitHub may not have read its workflow file yet: Build AAPS is missing from the Actions tab, and there is no Run workflow button. Any small change to the file makes GitHub read it:
In your repository, open Code, then the folder
.github, thenworkflows, then the filebuild.yml.Tap the ⋯ menu at the top right of the file, then Edit file… In place (on a computer, click the pencil).

Tap at the very end of the text and add an empty line (Enter). Tap Commit changes… at the top.

Tap Commit changes again.

Open the Actions tab again: Build AAPS is now in the list of workflows (on a phone, the list opens with the icon at the left of All workflows). Tap it, then Run workflow.

The build failed (red cross)
On the setup page, tap Open my builds and tap the build with the red cross.

The page of the build shows Failure, and which part failed: AAPS / Check (the repository, the secret, the version or the variant: nothing was built) or AAPS / Build AAPS.
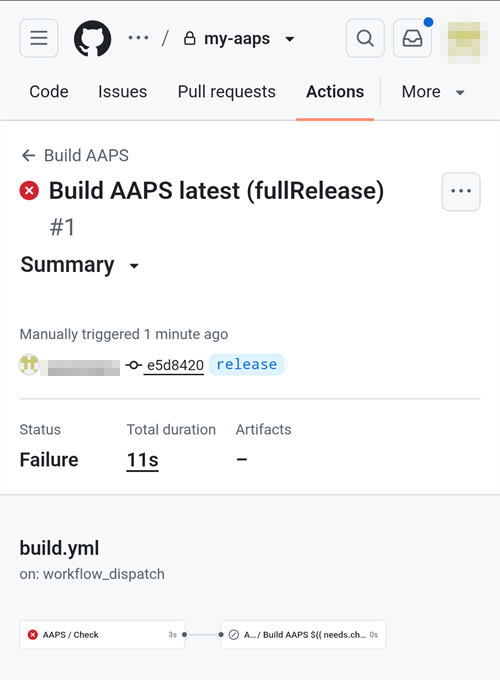
Scroll down to Annotations, with your finger on the text, not on the diagram. The red lines explain the problem: tap Show more to read the whole message, then find it below.

“Secret KEYSTORE_SET is missing”: do step 3 of the setup page.
The build stops with “This repository is PUBLIC”: in your repository, open Settings → General → Danger Zone → Change visibility → Private, then build again.
“Version … does not exist”: only released versions of AAPS can be built, the ones on the tags page of nightscout/AndroidAPS, such as
3.3.2.0. A branch name such asdevdoesn’t work. Uselatest, or type a tag exactly as listed.“Variant … is not supported”: your workflow file is an older version. Replace it as explained in Updating AAPS.
“The secret is too short”, “The secret is not a valid code” or “The secret does not contain a keystore”: the wrong text was pasted into the secret, often the word
KEYSTORE_SETitself, or only part of the code. In your repository, open Settings → Secrets and variables → Actions, editKEYSTORE_SETand paste the long code from Copy secret again (redo step 2 of the setup page first if you closed it).“Keystore, password or alias is wrong”: check your keystore’s password and alias, then redo steps 2 and 3 of the setup page.
“Google Drive access has expired or was revoked”: redo step 6 and update the
GDRIVE_OAUTH2secret.“Process completed with exit code 1” and a red line with only a link to
services.gradle.org, after less than a minute: the build could not download Gradle, a tool it needs to build the app. The Gradle website was not responding. Your repository and your settings are fine. Wait half an hour, then run the build again.Another error: read the build log, then run the build again. If it fails again the same way, ask for help with the name of the failed step and the error lines. Never share the content of your secrets.
Step 5: the app
No Download link, or the GitHub app opened: the GitHub app cannot download builds. Open the build in Chrome as explained in step 5. To stop GitHub links opening in the app: Android Settings → Apps → GitHub → Open by default → turn off Open supported links.
AAPS-CI Troubleshooting
First: find out what went wrong
When a build fails, GitHub keeps a log of every step. The log tells you which step failed and why. Read it before you try anything else: the error message is what you look for on this page, and what helpers will ask for.
In your GitHub copy of AndroidAPS, open Actions. A failed build has a red cross. Tap its name.
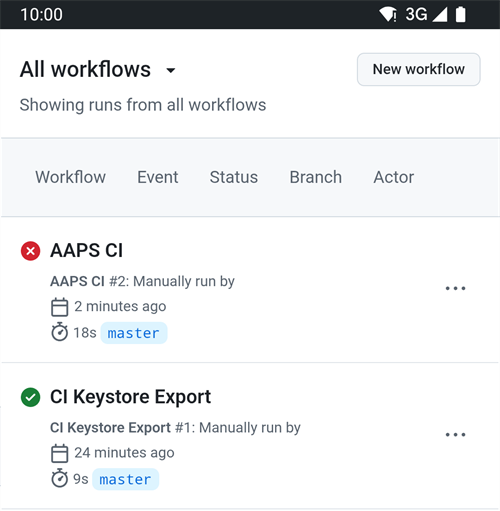
The run summary shows Failure and, below, the job that failed (Build AAPS, with a red cross).

Scroll down to Annotations and tap the red Build AAPS line.

The job opens. Steps with a grey tick worked. The step with the red cross is the one that failed: GitHub opens it for you. The steps after it were skipped (grey circle).
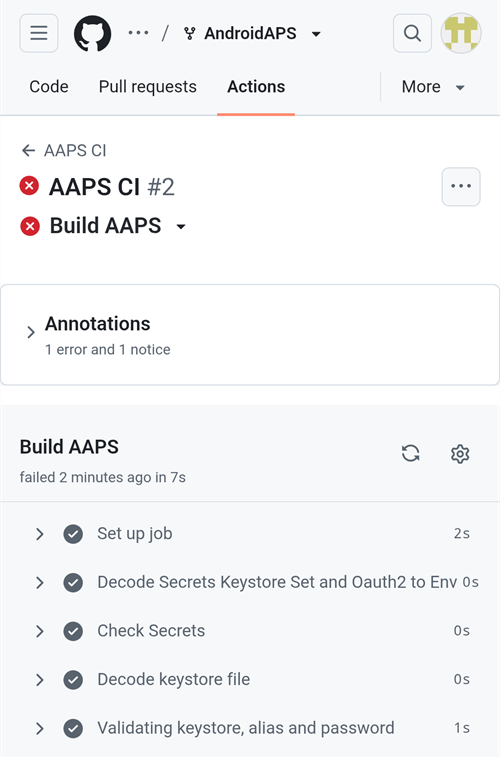
Read the lines just above
Error: Process completed with exit code 1.: they explain the problem. In this example, the step Retrieving Google Drive access token failed withinvalid_grantandToken has been expired or revoked., see Google Refresh Token Expired.
Tip
Asking for help? Share the name of the failed step and the error lines (a screenshot like the one above is fine). Never share the content of your secrets.
Update a secret
Many fixes mean replacing the value of a secret. In your GitHub copy of AndroidAPS, go to Settings → Secrets and variables → Actions and tap the pencil next to the secret.
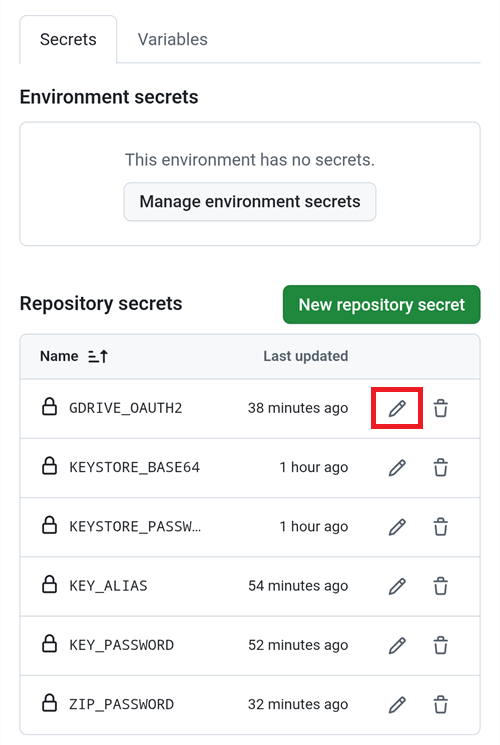
Enter or paste the new value and tap Update secret. GitHub never shows the old value: the field is always empty.

Run the build again after a fix
Once you have fixed the cause, you do not need to start from scratch: open the failed run, tap … (top right), then Re-run failed jobs.

Tap Re-run jobs. You can also start a new build from Run workflow as usual.

aaps-ci-preparation web page
The preparation page is displayed by a temporary local server (for example Simple Web Server on a computer), which also receives the Google refresh token.
If you see the screen below, the local server has stopped or is not reachable.
Close the preparation page, check that the local server is running, then reopen aaps-ci-preparation.html the same way as in Step 2 and complete the remaining steps. This is needed in particular when creating the initial Google connection during setup.

Google Refresh Token Expired
Google OAuth2 refresh tokens will expire if not used for 6 months, and may also become invalid under other conditions (e.g., you have changed your Google account password, or manually revoked access). For more details, see the Google OAuth2 documentation.
In the build log, the step Retrieving Google Drive access token fails with
invalid_grantandToken has been expired or revoked.:

If your build fails due to an expired or revoked Google refresh token, you will need to redo the Google Drive Auth steps to obtain a new
GDRIVE_OAUTH2token, update the secret in your GitHub repository, then re-run the build.If the authorization fails again, or Google does not ask for your consent anymore, remove the existing AAPS access from your Google Account first, see below.
Remove AAPS Access From Your Google Account And Restart The Authorization
If the Google Drive authorization keeps failing, or you want to start again from a clean state, first remove the access you previously gave to AAPS, then redo the authorization.
On your phone, open https://myaccount.google.com, tap Security, scroll down to Your connections to third-party apps & services and open the list of linked apps. You can also go directly to https://myaccount.google.com/connections.
Tap AAPS in the list.

The page shows the access you gave to AAPS (the Google Drive files used with the app). Tap Delete all to remove the connection, or tap See details to review it first.

On the details page, tap Remove all access.

Tap Confirm.

Google confirms that AAPS no longer has access. AAPS no longer appears in the list of linked apps.

Now restart the authorization cleanly: close both the preparation page and the file manager app, reopen aaps-ci-preparation.html from the file manager and redo the Google Drive Auth steps. Google will ask you to grant access again and the page will provide a new
GDRIVE_OAUTH2token.Update the
GDRIVE_OAUTH2secret in your GitHub repository with the new token, then re-run the build.
Disable Software That May Interfere With OAuth Verification
Disable any VPN or security app (firewall, antimalware,…) on the phone before trying to get the OAuth key.
Check GitHub Actions Permission Settings
Make sure GitHub Actions policies are set to “Allow all actions and reusable workflows” (Settings → Actions → General). If you change it, press Save below the options.

actions/checkout@v4 and actions/setup-java@v4 are not allowed to be used in xxxxx/AndroidAPS.
Actions in this workflow must be: within a repository owned by xxxxx
Check GitHub Workflow Permissions Settings
If the build fails immediately with an “Invalid workflow file” error similar to the one below, the default workflow permissions of your repository are too restrictive:
Invalid workflow file
The workflow is not valid. .github/workflows/aaps-ci.yml (Line: 361, Col: 3):
Error calling workflow 'xxxxx/AndroidAPS/.github/workflows/cleanup-workflow-runs.yml@...'.
The nested job 'cleanup' is requesting 'actions: write', but is only allowed 'actions: none'.
Make sure Workflow permissions are set to “Read and write permissions” (Settings → Actions → General → Workflow permissions), then save and re-run the build workflow.

Build Fails Checking The Keystore Password
In the build log, the step Validating keystore, alias and password fails with
Either KEYSTORE_BASE64, KEYSTORE_PASSWORD, KEY_PASSWORD, or KEY_ALIAS is incorrect, followed byKeystore was tampered with, or password was incorrect. The build stops there: the keystore and passwords are checked before AAPS is built.

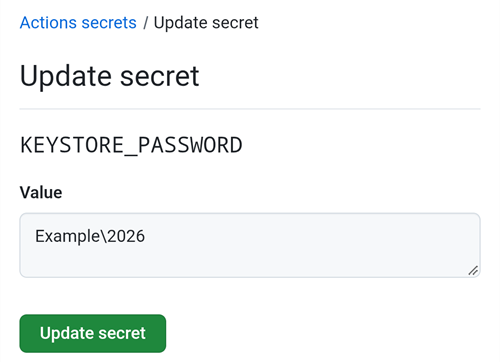
The build workflow keeps every character of your passwords intact. Enter
KEYSTORE_PASSWORDandKEY_PASSWORDexactly as they are, without adding a backslash or any other escape character. If you added backslashes, update the secrets with the password exactly as it is. The example below is wrong: the password isExample2026, the backslash was added.
If the build still fails when signing the APK although your password is correct, and the password contains
$, a backtick,"or\, the workflow file in your fork is older than September 2026 and still parses these characters. Sync your fork with the latest dev, then re-run the build workflow.The vertical bar
|is a special case. The preparation page of Option 1 combines the keystore, passwords and alias into oneKEYSTORE_SETsecret separated by|, and the workflow splits it on that character. The password generated by the preparation page contains only letters and digits, so this cannot happen with Option 1. It can only happen if you assembled aKEYSTORE_SETsecret yourself from a password containing|. In that case, deleteKEYSTORE_SETand enter the separate secrets of Option 2 instead.